Installation Guide - Jaspersoft Reports Server for VetView 2.X App on Win Server 2019
VetView
Installation Guide for Jaspersoft 7.9.1 Professional
on Windows Server 2019 Machine
Table of Contents
Introduction
Install JasperReports Server 7.9.0
Install JasperReports Server 7.9.1
Install VetView Provided Directory/Files
Configurations to Support Tomcat Manager and Remote Connections
Allow Remote Connection to Jaspersoft's UI via Windows Defender Firewall
Define username/password for Jaspersoft's Tomcat Web App Mgr UI Login
Allow Remote Connection to Jaspersoft's Tomcat Web App Mgr UI
Start JasperReports Server Service and Log into the UI
Customize Jaspersoft UI for VetView Configurations
Import VetView Provided Export Zip Files
Connect to the VetView Data Source
Uninstall JasperReports Server
Introduction
This guide documents the steps for installing Jaspersoft 7.9.1 Professional on a Windows Server machine for support of VetView data visualizing and reporting. A folder will be provided by VetView which should be copied onto the server on which Jaspersoft is to be installed. This server shall also have Google Chrome installed.
Install JasperReports Server 7.9.0
Note that for these instructions, the VetView provided folder, named TIBCO, was copied onto the Desktop of the user that is logged into this server. Navigate to the JasperReports Server 7.9.0 directory in the TIBCO directory listed below and as shown in the snapshot below.
C:\Users\<logged-in-user>\Desktop\TIBCO\JasperReports Server\7.9.0
Note that the examples provided in this document for the folder for the logged-in-user is s-vet-vetviewldap. This logged-in-user name is the installer's choice.
Next right click on TIB_js-jrs_7.9.0_win_x86_64.exe and select "Run as administrator" to initiate the installation as shown in snapshot below. 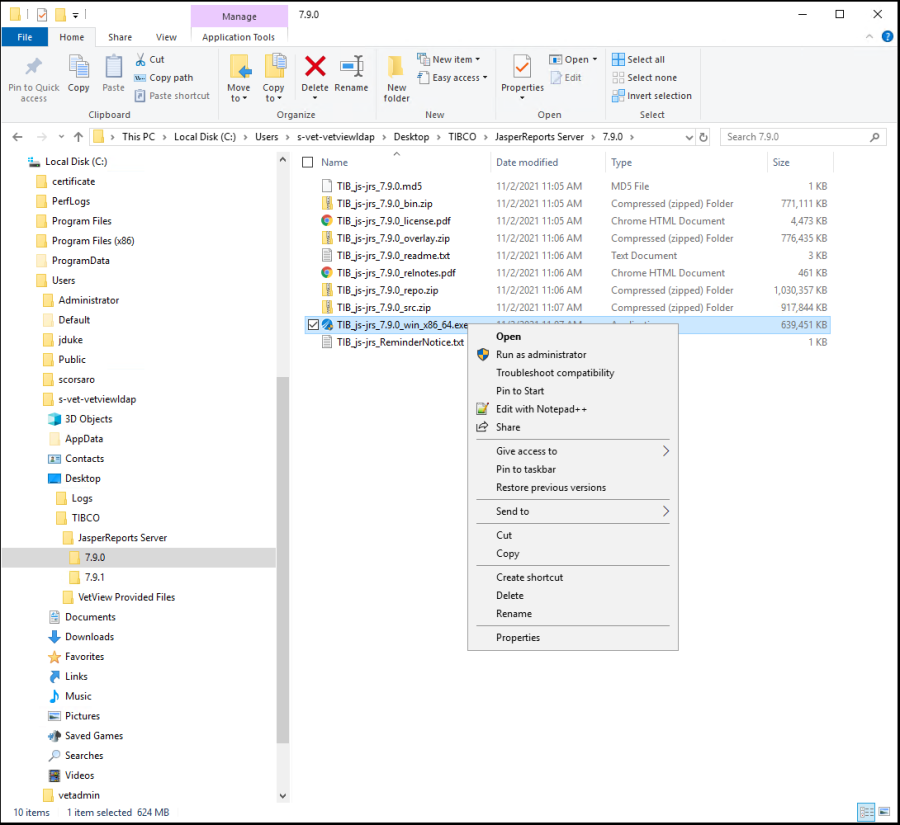
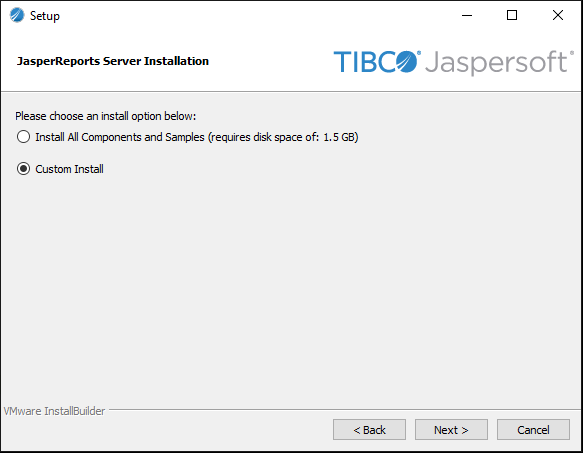
Select Custom Install as shown above, then confirm the installation folder as shown below. 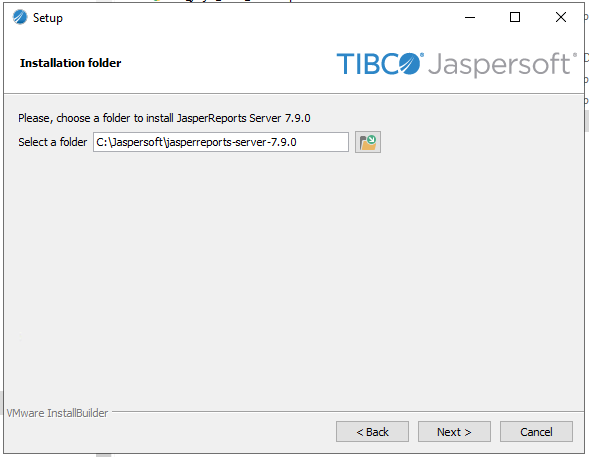
In the next screens, select Yes to use the Chromium browser.
Note that the Google Chrome browser needs to be installed on this server prior to this installation.
Then select the Chromium executable installed on this computer.
Then select to use the bundled Tomcat.
Then select to use the bundled PostgreSQL database.
In the next screen shown below, define the Tomcat server port and shutdown port.
Verify the ports are not already in use. The screenshot below is a typical configuration; however, the port selection is the installer's prerogative.
Note, on a Windows server you may check for ports in use with the following command executed in a Windows PowerShell window. This example checks for port 8080.
PS C:\Users\s-vet-vetviewldap> netstat -aon | findstr '8080'
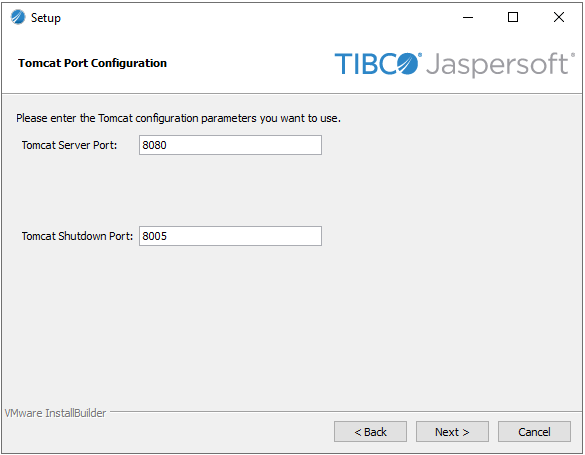
In the next screen, use the default PostgreSQL Database Server port, 5432, if not already in use.
In the next screen, choose whether to install sample databases and sample reports; this is user preference.
And then acknowledge the Keystore Warning message to reach the Ready to Install screen as shown below.
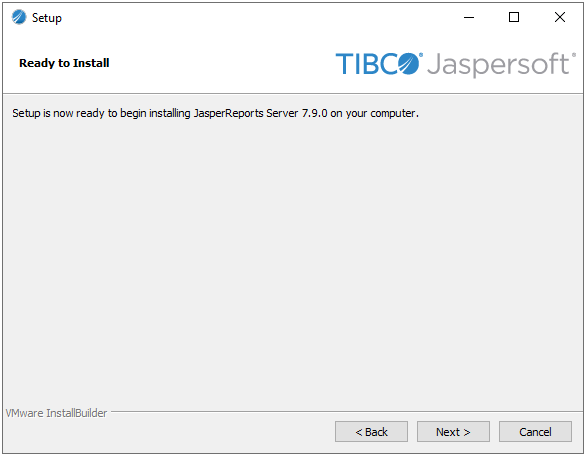
Select the Next button above to initiate the installation as shown below.

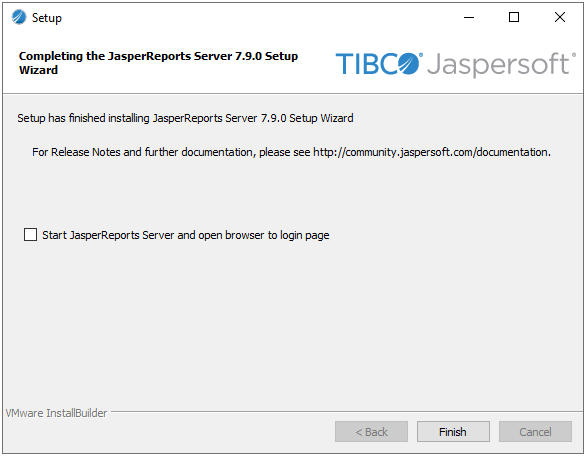
Once installation is complete and before selecting the Finish button below, uncheck the box next to "Start JasperReports Server . . . ".
This is done to support the next steps which will be the installation of JasperReports Server 7.9.1.
Note on the desktop, as shown below in the snapshot, that during the Jaspersoft Reports 7.9.0 installation the following two shortcuts were created: Start JRS Service and Stop JRS Service.
Also included in the snapshot is the TIBCO folder referenced above. 
Install JasperReports Server 7.9.1
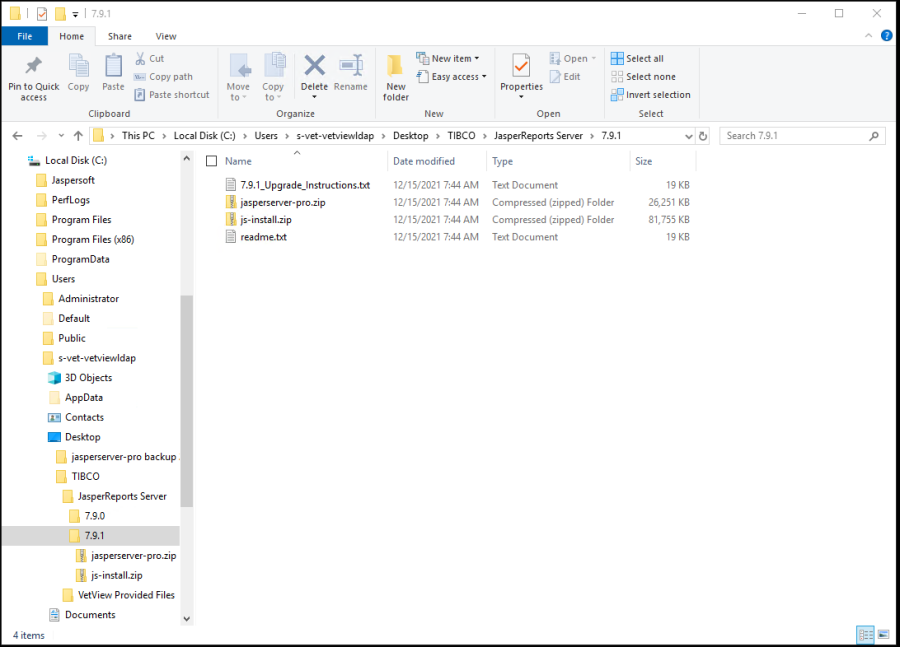
Navigate to the JasperReports Server 7.9.1 directory in the TIBCO directory listed below and as shown in the snapshot below.
C:\Users\s-vet-vetviewldap\Desktop\TIBCO\JasperReports Server\7.9.1
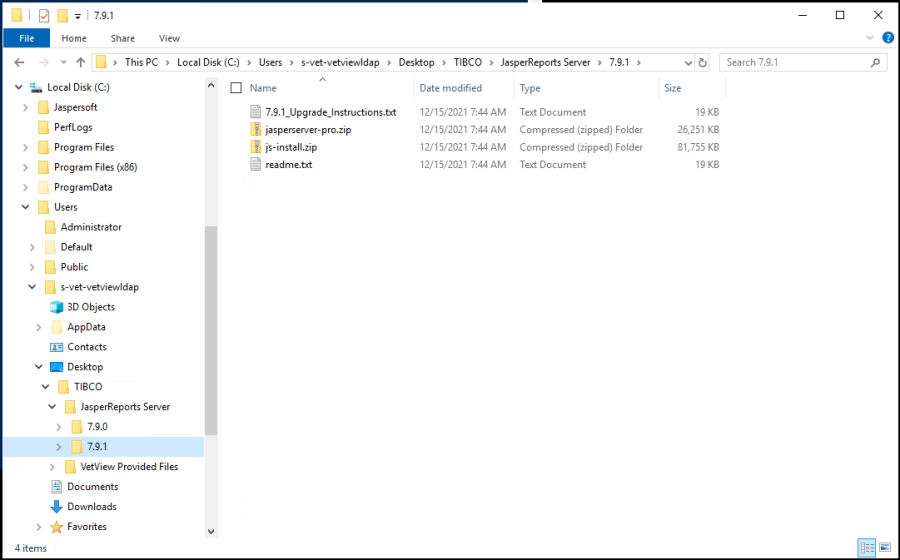
Open the 7.9.1_Upgrade_Instructions.txt file listed above. Shown below is a portion of this file, which provides the instructions for installing the JRS 7.9.1 hotfix.
Follow the steps listed in these instructions for the installation of the JRS 7.9.1 hotfix which shall be applied to the previously installed JRS 7.9.0. 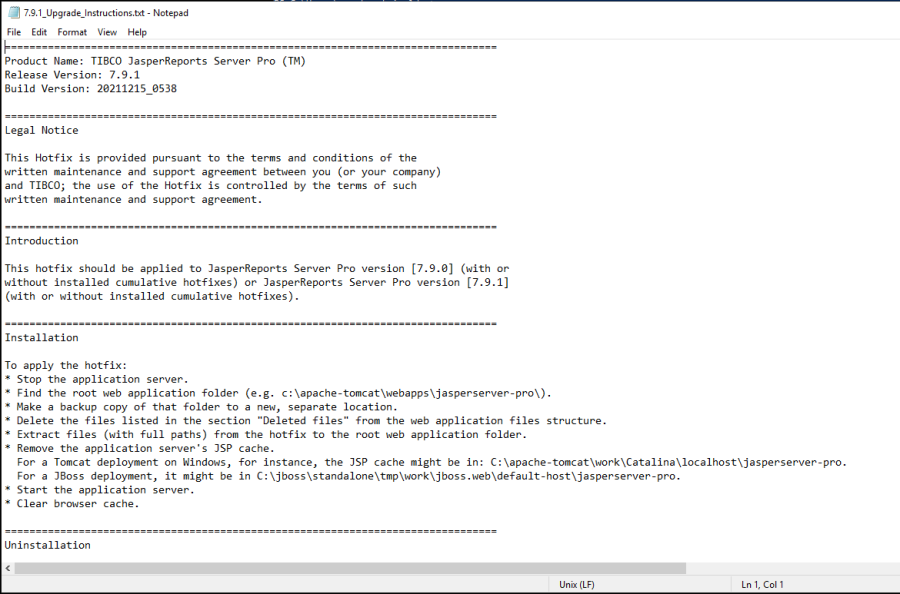
Additional details have been provided below for each of the 7.9.1 Installation steps listed above.
To verify that the JRS Service is stopped, view the most current jaspersoft tomcat catalina log file. The directory containing this log file and a list of example log lines from this file are provided below.
If no catalina log file exists, then the JRS Service has not been started.
Directory for tomcat log files:
C:\Jaspersoft\jasperreports-server-7.9.0\apache-tomcat\logs\
The last lines in the most recent catalina log file (example log file name: catalina.2021-11-04.log) should state something like these lines below to indicate that Jasper Reports server is stopped:
04-Nov-2021 12:11:42.365 INFO [Thread-110] org.apache.coyote.AbstractProtocol.stop Stopping ProtocolHandler ["http-nio-8080"]
04-Nov-2021 12:11:42.381 INFO [Thread-110] org.apache.coyote.AbstractProtocol.destroy Destroying ProtocolHandler ["http-nio-8080"]
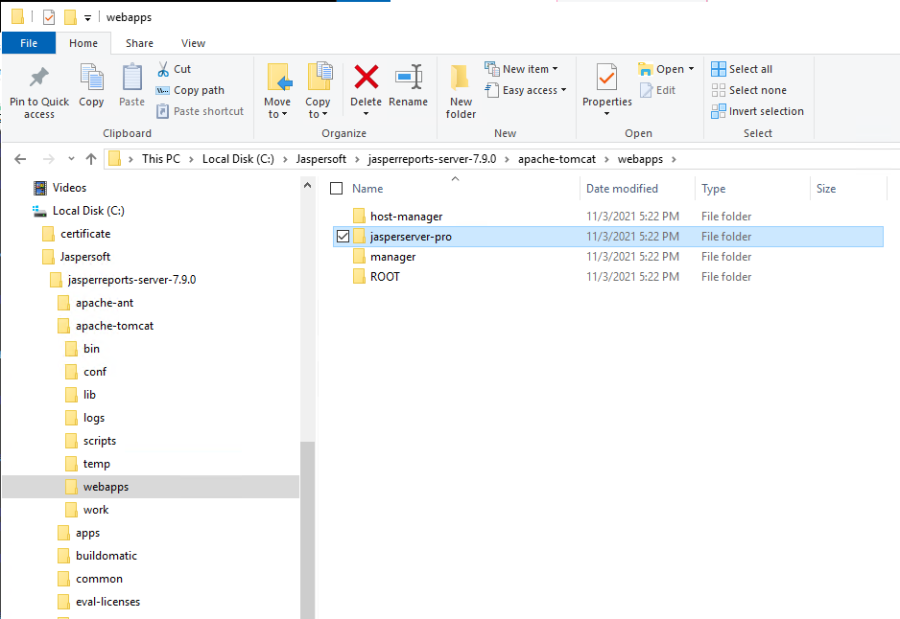
To find the root web application folder, below is a snapshot of the jasperserver-pro root (not ROOT) web application folder for which a backup copy should be made in a separate directory.
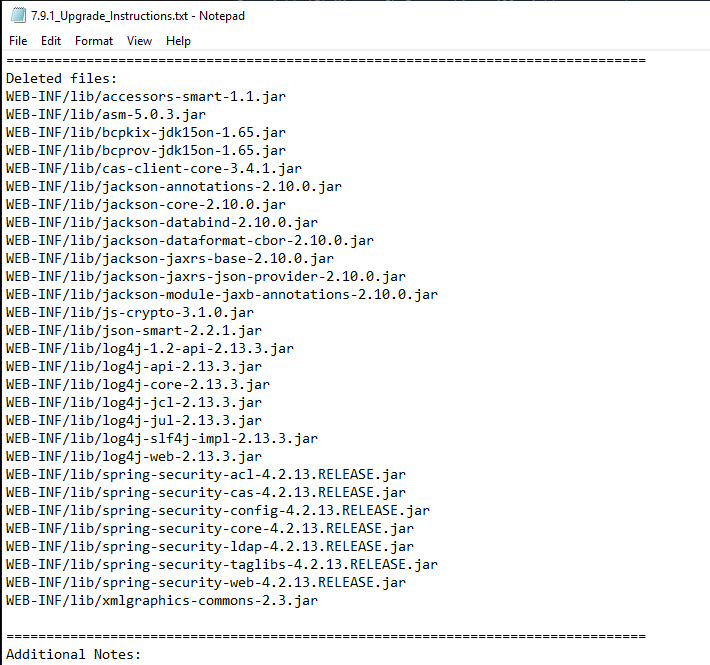
Below is the "Deleted files" section from the 7.9.1_Upgrade_Instructions.txt file.
Use File Explorer to navigate to the files' directory listed above in the jasperserver-pro directory as shown in the snapshot below.
Then select the files in File Explorer (a few shown below) to delete the files shown in the list above.
There should be a total of 29 files selected for deletion.
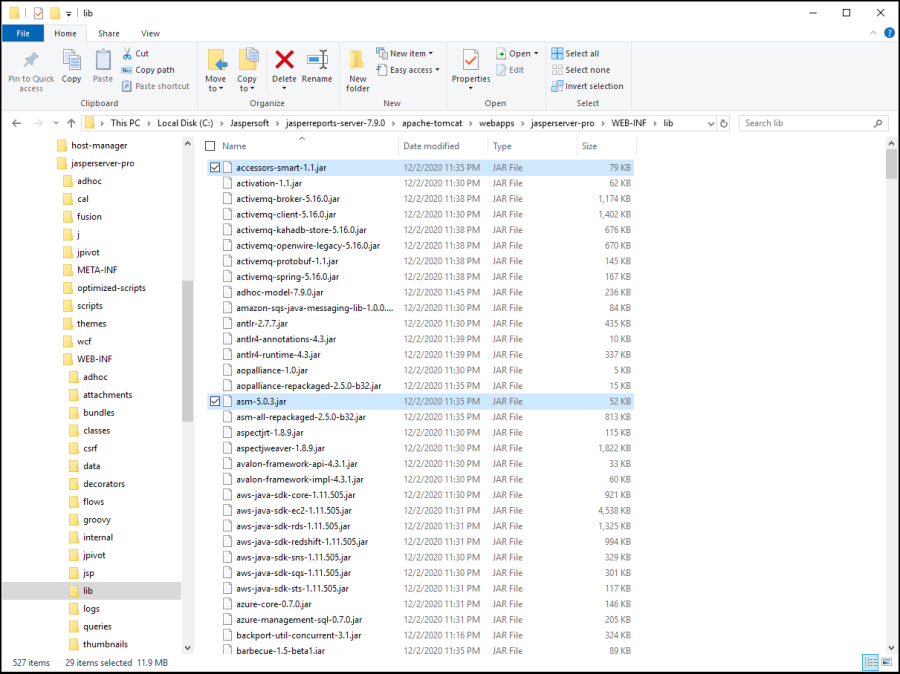
Select the red X in the ribbon at the top of the snapshot above to delete all 29 files.
To extract the hotfix files, navigate down into the TIBCO folder into the 7.9.1 directory listed below and as shown in the snapshot below.
C:\Users\s-vet-vetviewldap\Desktop\TIBCO\JasperReports Server\7.9.1
Next select the jasperserver-pro.zip folder above resulting in the view as shown below.
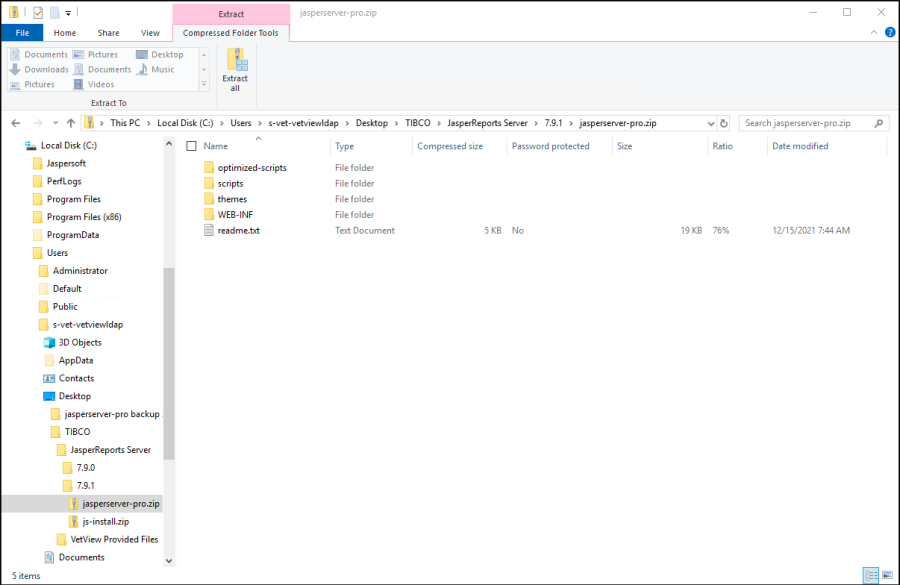
Next select the Extract all button in the ribbon at the top of the snapshot above.
The following window will open. 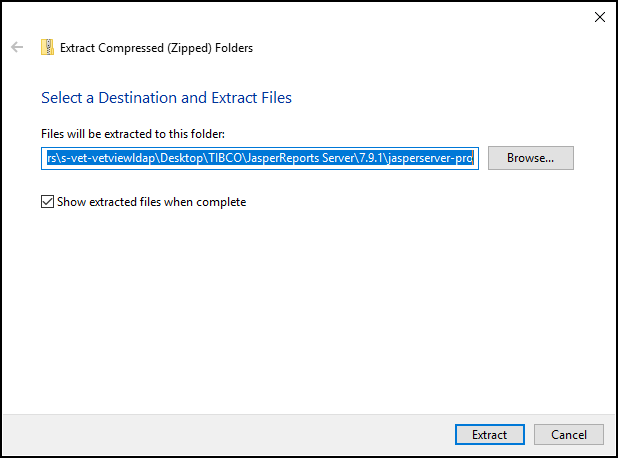
Select the Browse button above to define the correct destination folder as shown below.
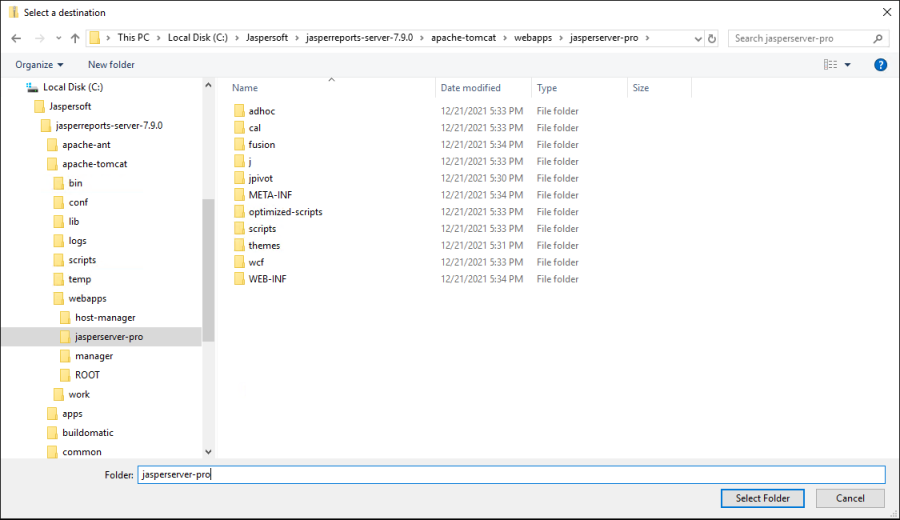
Select the Select Folder button above resulting in the window below.
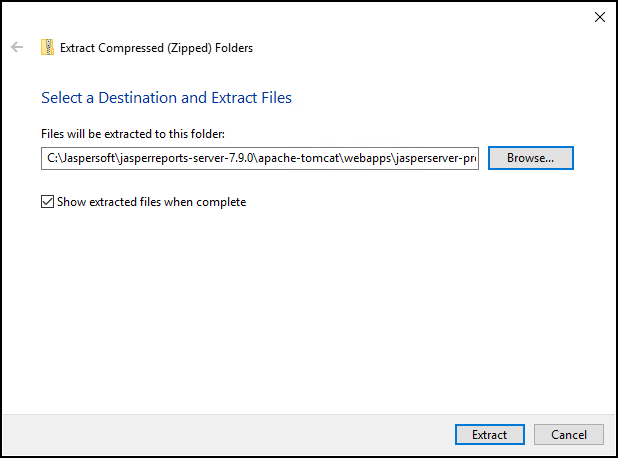
Selecting the Extract button above should result in the window below.
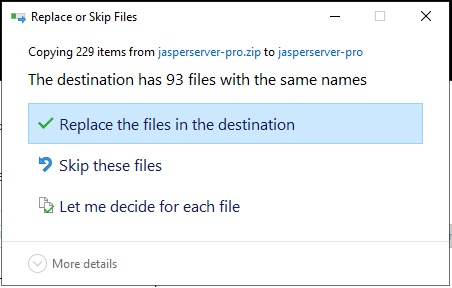
Select "Replace the files in the destination" to commence the extraction.
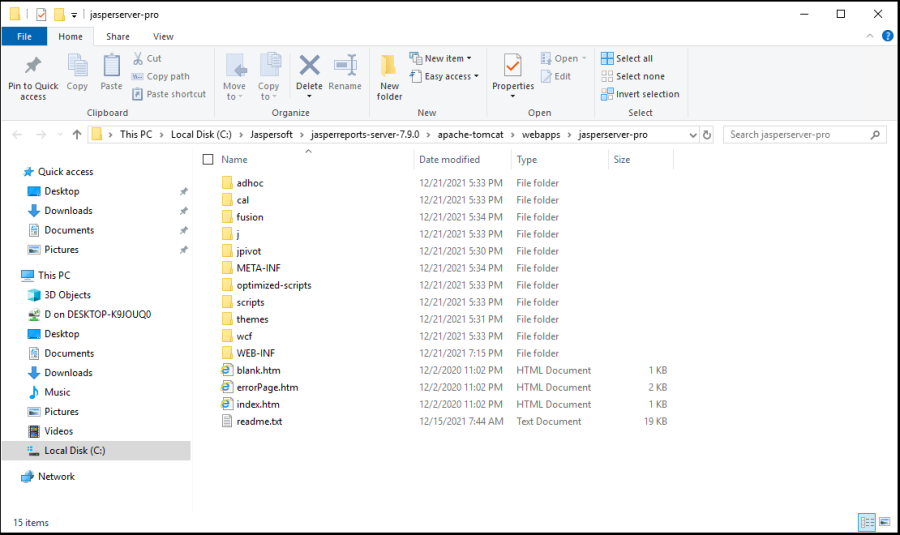
The "extracted files when complete" folder will appear as below.
As a final step for this 7.9.1 installation, remove any jasperserver-pro cache, if it exists, according to the instructions.
Install VetView Provided Directory/Files
Navigate to the following directory in the TIBCO folder for the VetView provided folders and zip files folder.
C:\Users\s-vet-vetviewldap\Desktop\TIBCO\VetView Provided Files
In the "VetView Provided Files" directory, select the "Extract To JasperReports-Server.zip" file to obtain the following view: 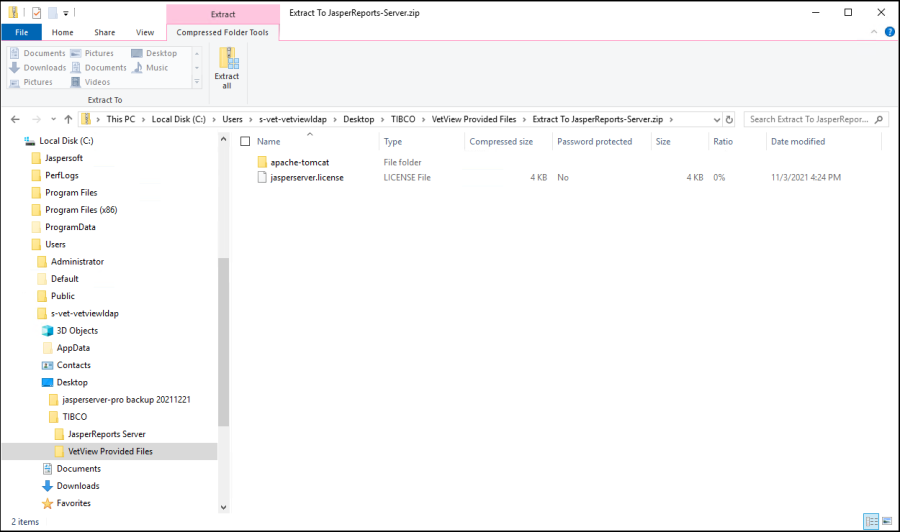
Then select the Extract all button in the ribbon at the top of the snapshot above.
The following window will open.
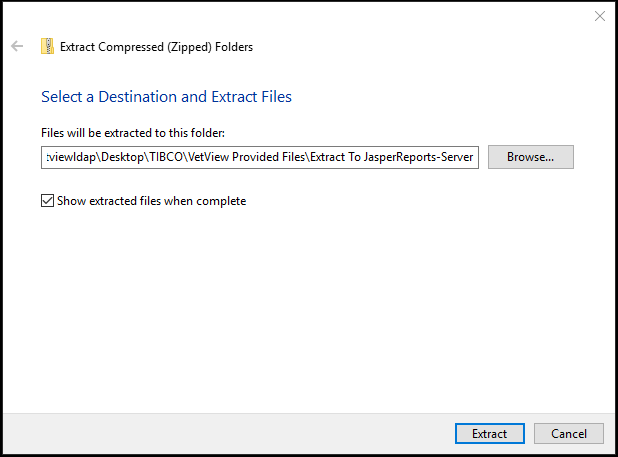
Select the Browse button above to define the correct destination folder as shown below.
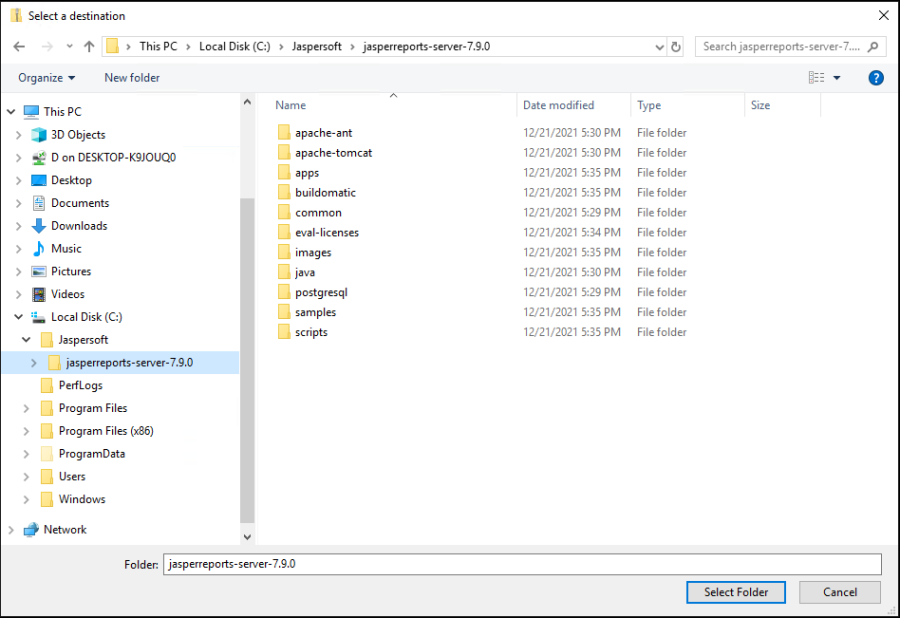
Select the Select Folder button above resulting in the window below.
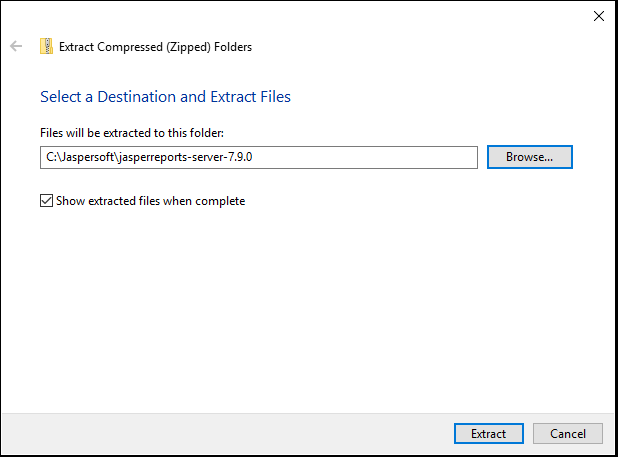
Selecting the Extract button above should result in the window below.
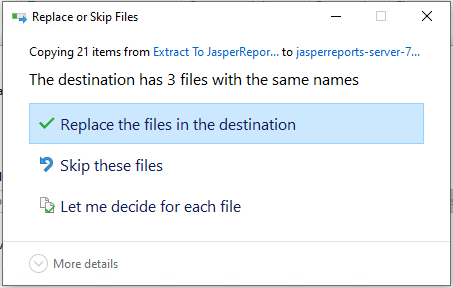
Select "Replace the files in the destination" to commence the extraction.
The "extracted files when complete" folder will appear as below. 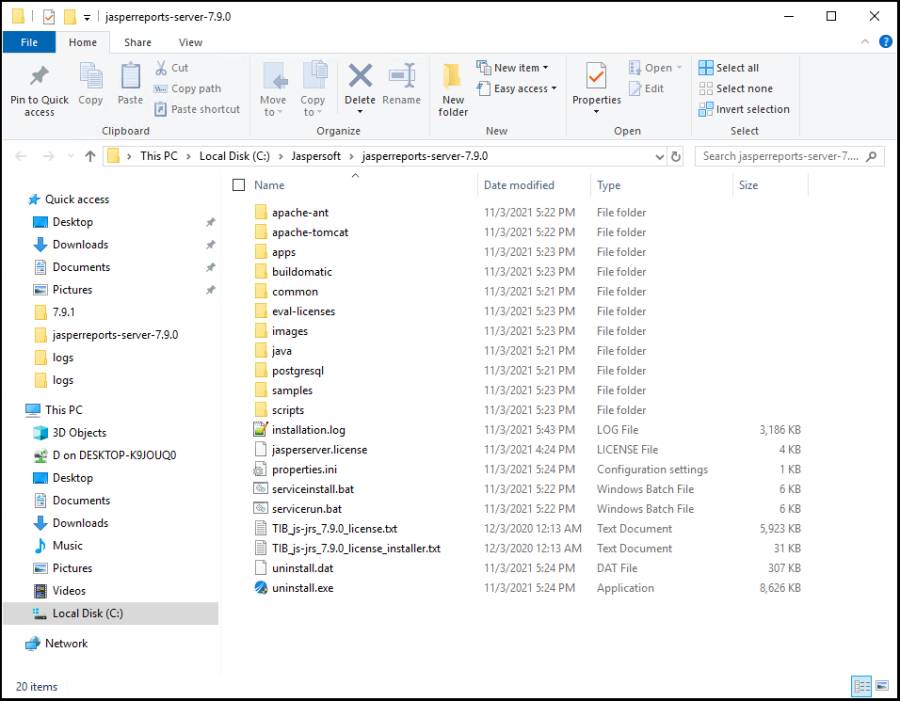
Configurations to Support Tomcat Manager and Remote Connections
Allow Remote Connection to Jaspersoft's UI via Windows Defender Firewall
To support connections to the Jaspersoft application from remote systems, the firewall must be configured to allow remote connections.
To support remote connections, open Windows Defender Firewall and select the "Allow an app or feature through Windows Defender Firewall" link as seen in the snapshot below. 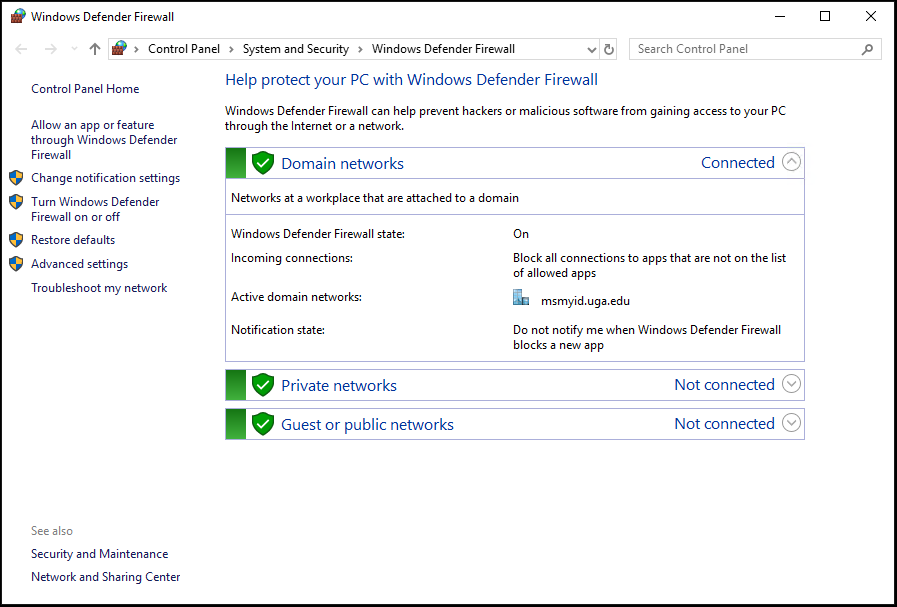
In the next window that appears, select the "Allow another app…" button.
In the next window, the Add an app window, select the Browse button.
In the next window, the Browse window, search for and select the jasper reports apache-tomcat executable.
This executable should be found in the following directory and will probably have a name similar to: tomcat8.exe. See snapshot below for the Browse window.
C:\Jaspersoft\jasperreports-server-7.9.0\apache-tomcat\bin 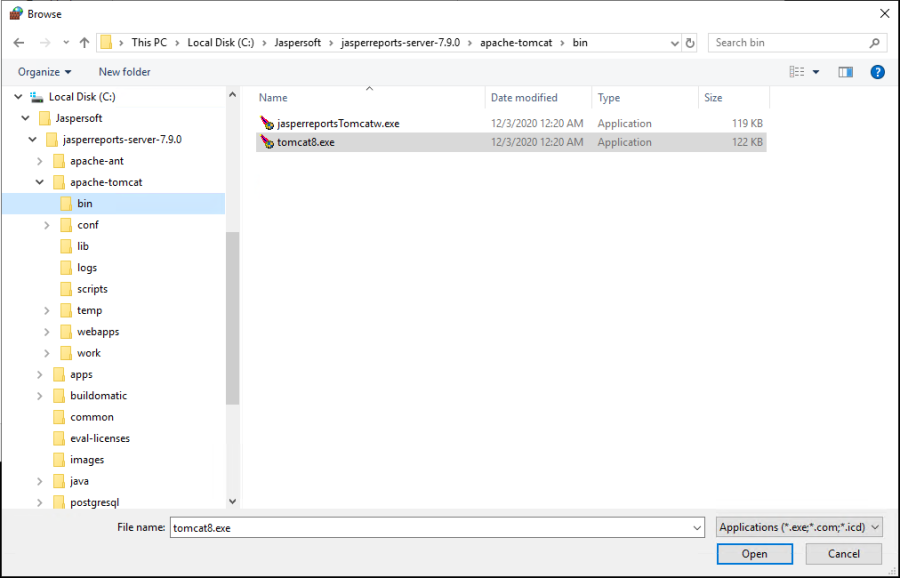
After selecting the tomcat executable in the snapshot above, select the Open button. The Add an app window will appear as shown in the snapshot below.
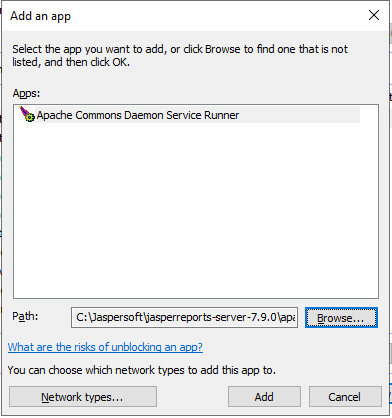
Select the Network Types appropriate for your network in the snapshot above.
Then select the Add button to add this executable to the Allowed apps and features table.
After verifying that the executable above is added to the table, select the OK button to close the Allowed apps window.
Define username/password for Jaspersoft's Tomcat Web App Mgr UI Login
To support a connection to Jaspersoft's Tomcat Web App Manager UI, the following tomcat-users.xml file must be modified.
NOTE: Review your organization's security requirements prior to proceeding with this change. Web App Manager UI logins must be properly protected from unauthorized connections.
C:\Jaspersoft\jasperreports-server-7.9.0\apache-tomcat\conf\tomcat-users.xml
The following line shall be added to this file within the tomcat-users section. Replace <your_username> and <your_password> with your username and password.
<user username="<your_username>" password="<your_password>" roles="manager-gui" />
The changes to the file must be saved. If JasperReports has not been started, then proceed to the next section. Otherwise, Jaspersoft's Tomcat process must be bounced for these changes to take effect. This may be done by using the Stop JRS Service/Start JRS Service shortcuts on the desktop.
Allow Remote Connection to Jaspersoft's Tomcat Web App Mgr UI
To allow remote connections to Jaspersoft's Tomcat Web App Manager UI, the following context.xml file must be modified.
NOTE: Review your organization's security requirements prior to proceeding with this change. Web App Manager UI logins must be properly protected from unauthorized connections.
C:\Jaspersoft\jasperreports-server-7.9.0\apache-tomcat\webapps\manager\META-INF\context.xml
Comment out the Remote Address Valve lines as shown below to allow connections from any ip address.
Or don't comment out the Valve section and redefine the ip address range in the allow line to only allow connections from a specific ip address or a more narrow range of ip addresses.
For example, allow="172\.\19\.\142\.\d+" will allow connections only from ip addresses in the 172.19.142.0/24 subnet.
<!--
<Valve className="org.apache.catalina.valves.RemoteAddrValve"
allow="127\.\d+\.\d+\.\d+|::1|0:0:0:0:0:0:0:1" />
-->
The changes to the file must be saved. If JasperReports has not been started, then proceed to the next section. Otherwise, Jaspersoft's Tomcat process must be bounced for these changes to take effect. This may be done by using the Stop JRS Service/Start JRS Service shortcuts on the desktop.
Start JasperReports Server Service and Log into the UI
Select the Start JRS Service icon on the desktop. The startup may take a minute or two. You may monitor the startup logs in the latest catalina log file which may be found in the following directory:
C:\Jaspersoft\jasperreports-server-7.9.0\apache-tomcat\logs
After JasperReports has started, open Google Chrome on the JasperReports server and go to: http://localhost:8080/jasperserver-pro/login.html
Note: Use the port number in the URL above that was defined during the installation; 8080 is the default.
The following login screen should open. 
After logging in, the following Jaspersoft home page should appear.
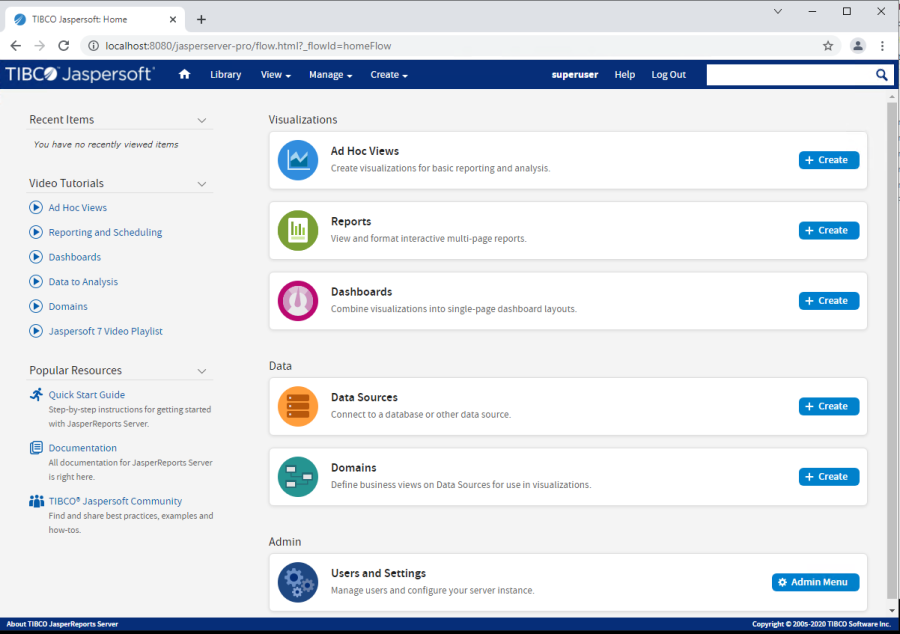
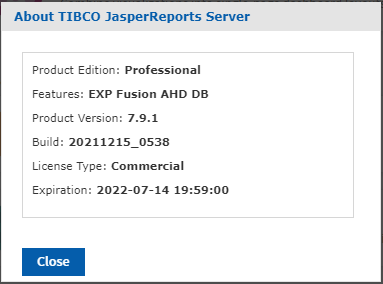
Select the About TIBCO JasperReports Server link at the bottom left of the screen above to view the following information.
Customize Jaspersoft UI for VetView Configurations
Import VetView Provided Export Zip Files
VetView will provide the following two files in the VetView Provided Files\Exports directory of the TIBCO folder:
- Organization_VetView.zip
- user.zip
The Exports directory location is:
C:\Users\s-vet-vetviewldap\Desktop\TIBCO\VetView Provided Files\Exports
Import these two zip files into the Jaspersoft UI by starting in the Jaspersoft UI home page (as shown above). Select the Manage drop down, then the Server Settings, then select Import on the left side.
The following page below will appear.
Use the page shown below to import all VetView provided export zip files.
NOTE 1: One of the zip files has already been selected in the snapshot below and the Legacy Key radial button has also been selected.
NOTE 2: Make sure to select the Import-Export Key that is appropriate for your installation. For this example, the Legacy Key radial button is selected when importing both VetView provided zip files.

Select the Import button above to import the VetView provided zip file, Organization_VetView.zip.
Should see an "Import succeeded" banner at the top when the import is complete.
Repeat this process for the second zip file, user.zip, and make sure to select the appropriate Import-Export Key for your installation.
Once both files have been imported into Jaspersoft, you may view the following pages in the Jaspersoft UI to verify the correct information was imported into your Jaspersoft system.
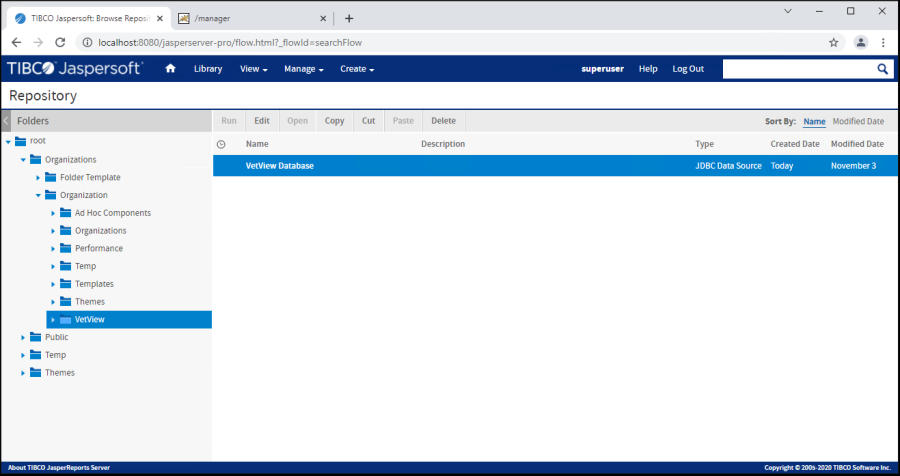
View the pages below by starting in the Jaspersoft home page, then select the View drop down, then Repository. Drill down into the folder structure on the left side to see views like the first snapshot below. 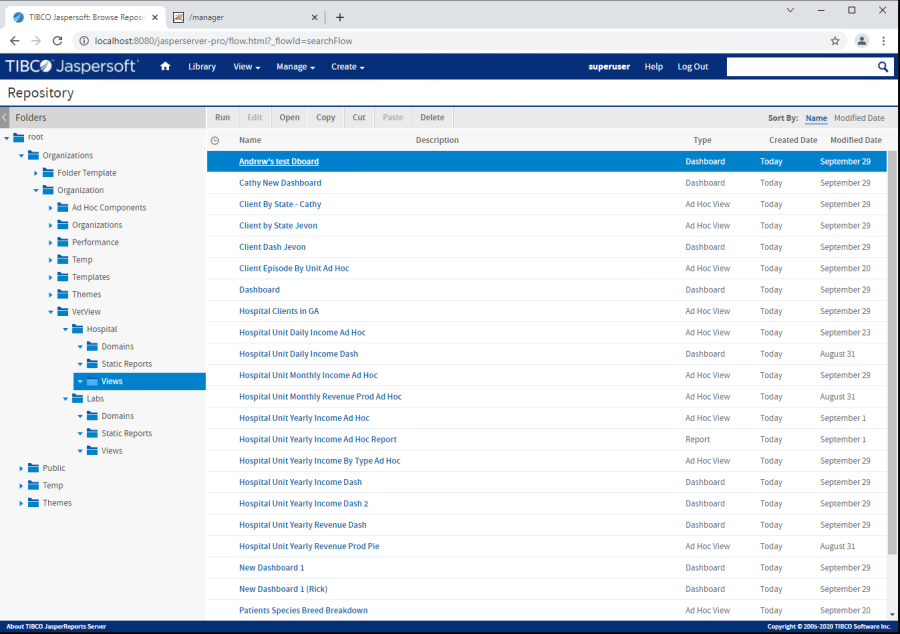
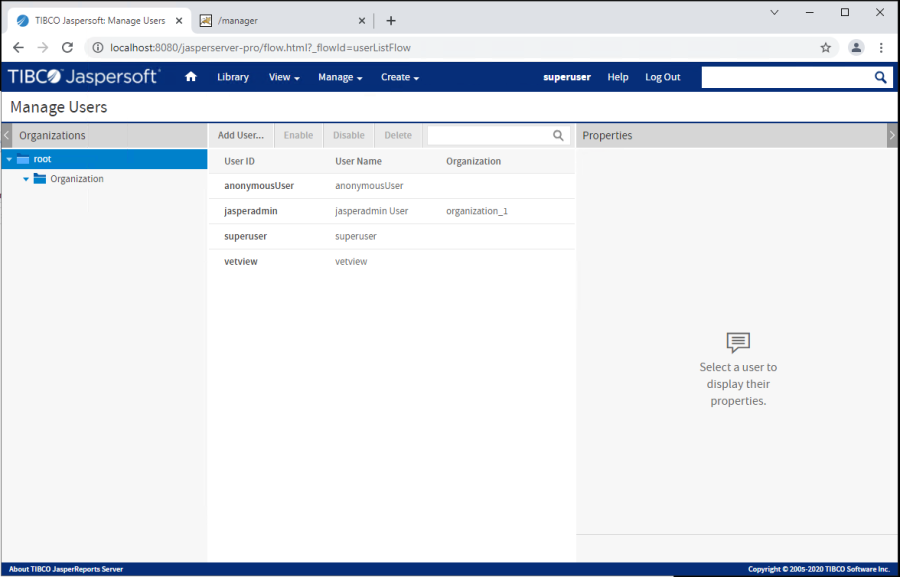
Next select the Manage drop down, then Users to view the vetview user as shown in the snapshot below.
Connect to the VetView Data Source
While in the Jaspersoft UI, select the View drop down, then Repository.
In the left pane, drill down into the Organizations folder.
The following page will appear when the VetView Organization in the left pane is selected.
With the VetView Database selected in the main pane, select the Edit button. The following page will appear.

Define the parameters necessary in the page above to successfully connect to the VetView database.
This will connect all the imported VetView reports to the VetView database.
After a successful Test Connection, select the Save button in the snapshot above.
The following screen will appear: 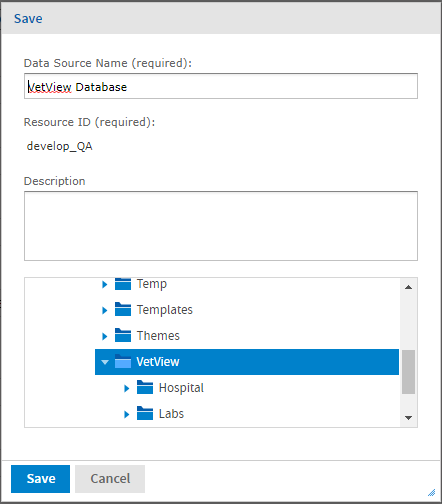
Select the Save button. All the predefined reports should now connect to the VetView database.
As a sanity check, you may view one of the predefined reports by selecting the View drop down, then Repository.
Drill down into the Organizations folder structure in the left pane.
Select a folder under VetView and then select a report in the main pane as shown below to view a report generated from the VetView database. 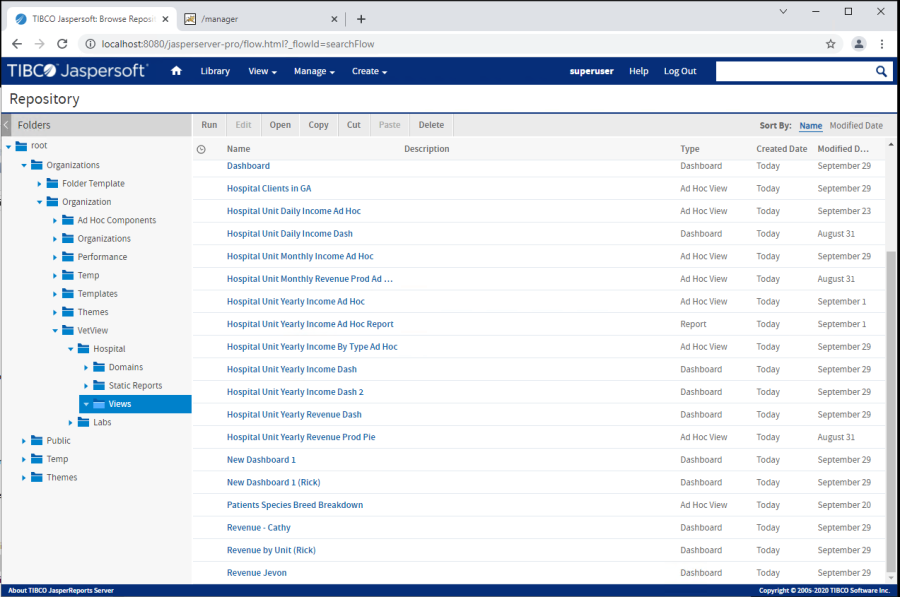
Uninstall JasperReports Server
In the event that Jaspersoft JasperReports needs to be uninstalled, select the Windows Start button as shown below and open the JasperReports Server 7.9.0 folder.
Select the Uninstall JasperReports Server link as shown in the snapshot below.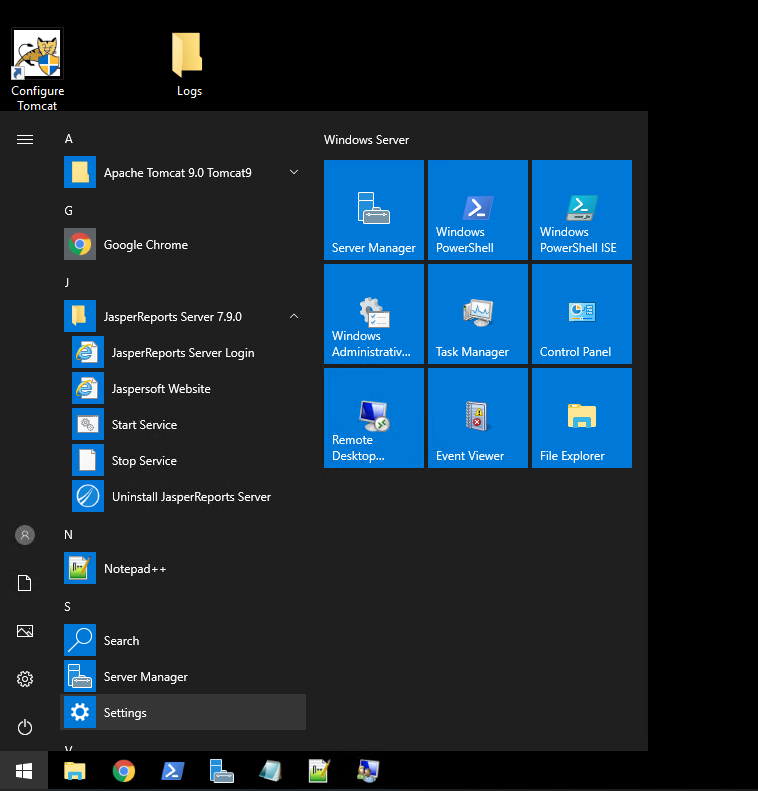
Or navigate in File Explorer to the directory listed below (also shown in the snapshot below).
C:\Jaspersoft\jasperreports-server-7.9.0
Then select the uninstall.exe file. 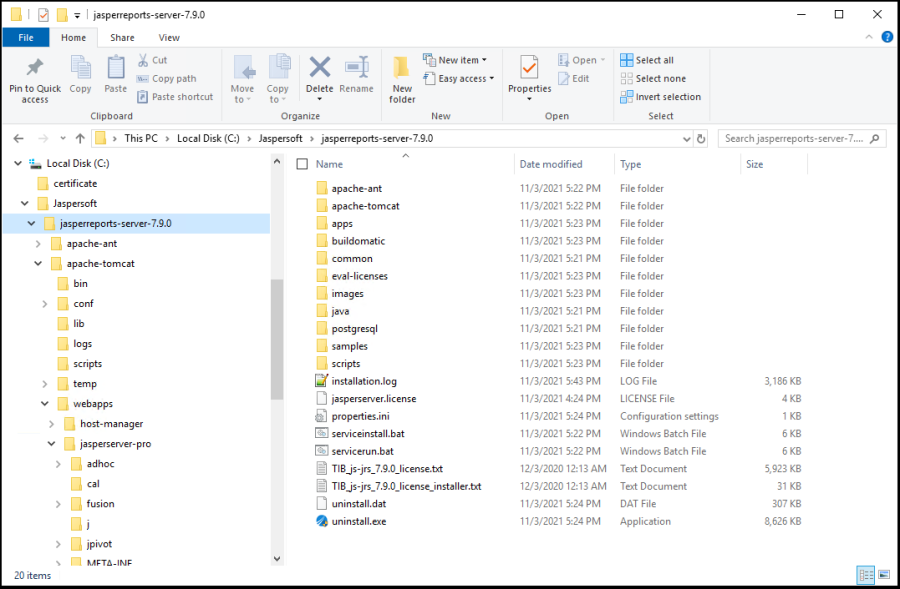
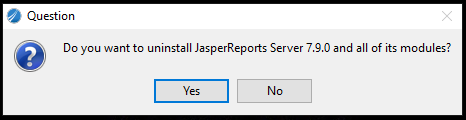
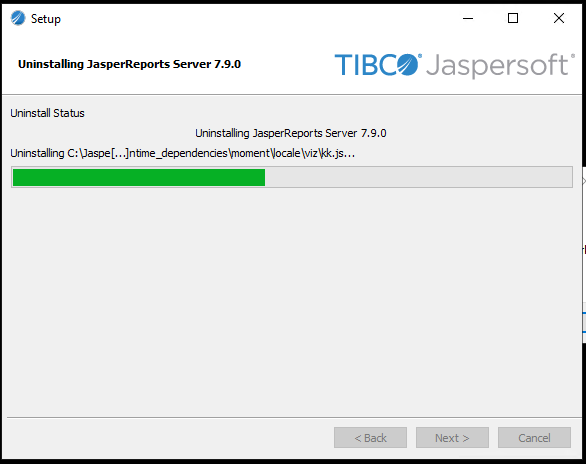
After the Uninstall process above completes, then delete any files or folders remaining in the C:\Jaspersoft directory.
Also delete the C:\Jaspersoft directory.