How do I customize the Header Bar in VetView 4.0?
- Cathy Allison
How do I customize the Header Bar in VetView 4.0?
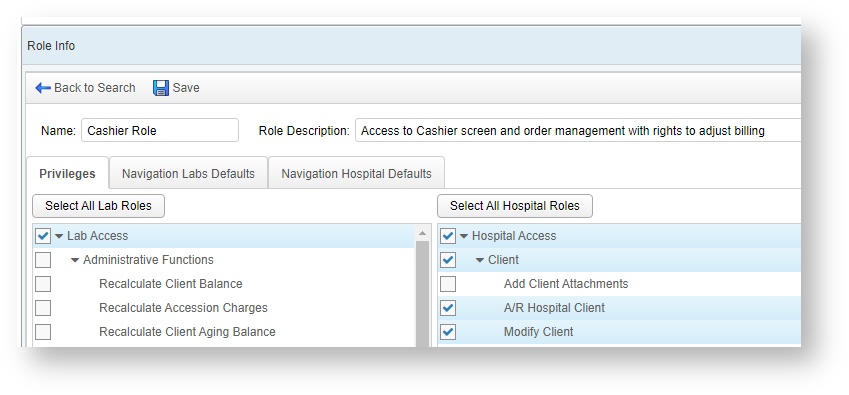
In VetView 4.0 and later, you can customize which screens appear on the header bar for various roles and users. Previously, VetView would hide the screens on the header bar that a user did not have access to, but there was no way to add in new screens for the roles who frequently accessed them via Navigation. For example, a Cashier role could not have the Cashier screen on the header bar.
Now a hospital or lab administrator can build out the header bars to match the most frequently accessed screens for each role.
Individual users can also modify their header bars, if they are granted the privilege to do so, so that their most important screens are pinned to the header bar.
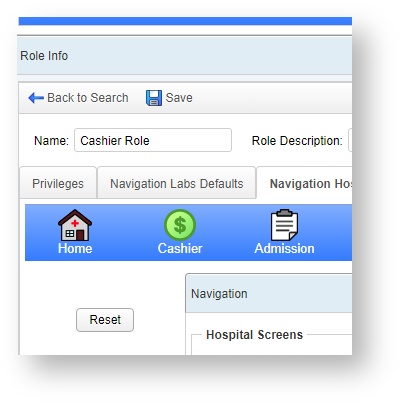
How do I build custom header bars for my Hospital and Lab Roles?
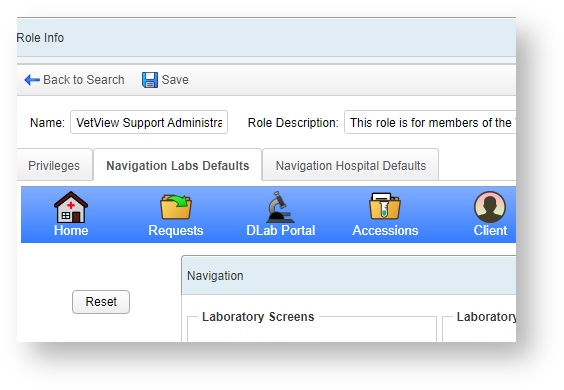
In version 4.0 of VetView, we have added two new tabs for Navigation Labs Defaults and Navigation Hospital Defaults.
You can now control the icons that will appear on the Header bar for a specific role.
In this example, we will modify the icons to match a "cashier role" for an employee who reviews orders and processes payments.
How do I add new icons to a Header bar?
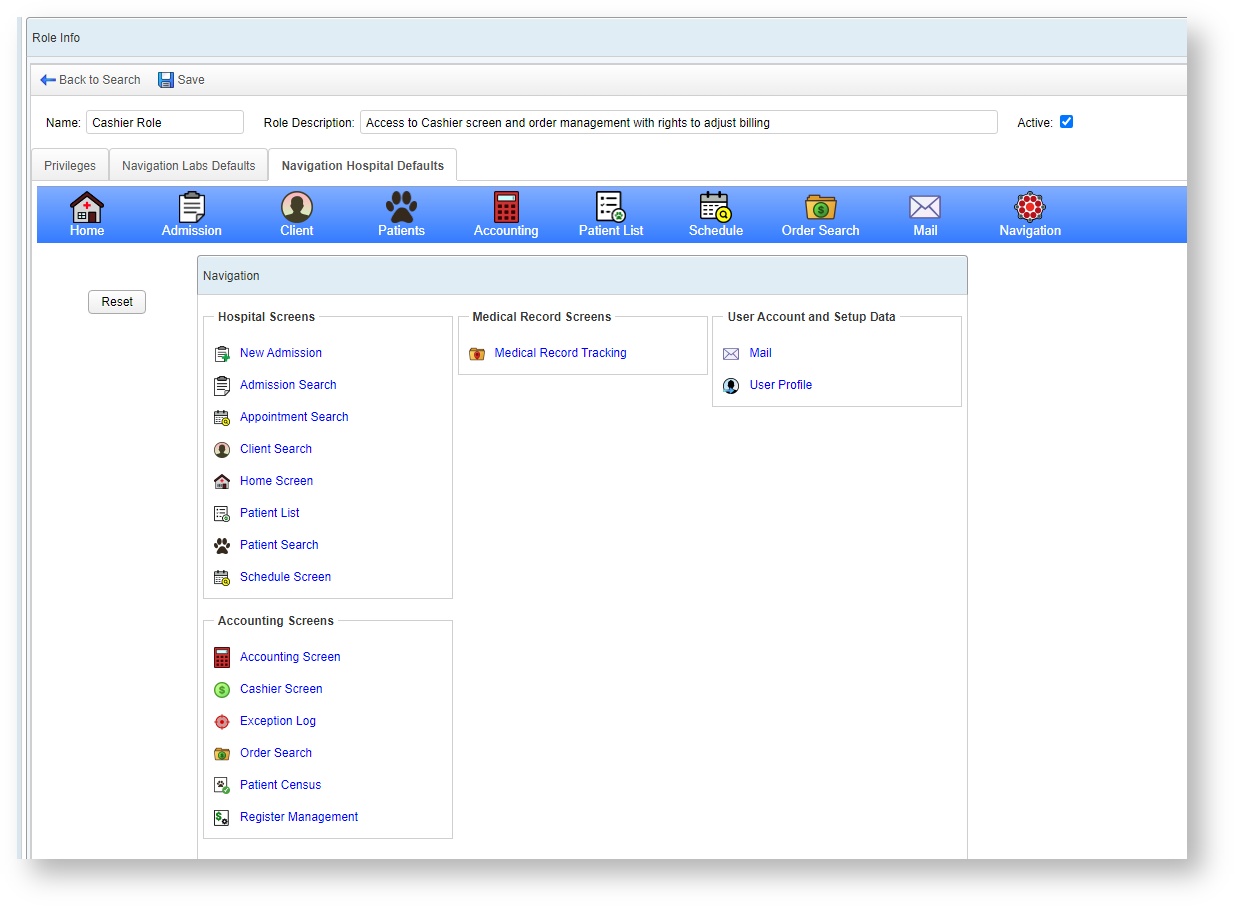
Click on the Navigation Hospital Defaults tab to view the current Navigation view and Header view for this role.
The standard VetView header icon set will appear at the top of the tab.
To add a new icon, click on the screen in the Navigation preview, and drag it up to the Header bar in the place you want it to appear.
For our cashiers, the Cashier Screen is the most important, so will will place it at the front of the header.
Once you grab the screen by clicking, a plus sign tool tip will appear at the cursor to let you confirm that you grabbed the correct screen.
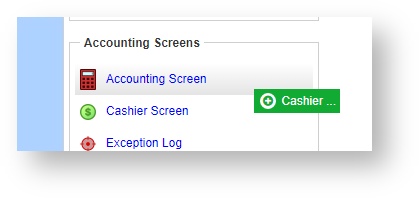
You can then drop this directly onto the toolbar where you want the icon to appear.
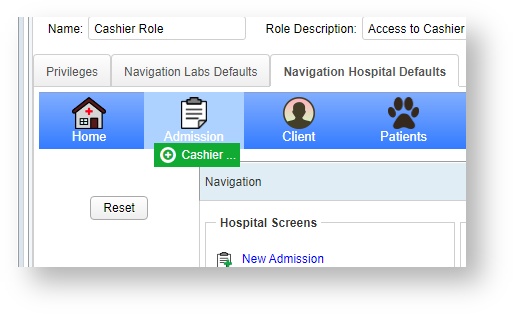
Now all users with the Cashier role will see this icon on their header bar, exactly where you have added it to the screen.
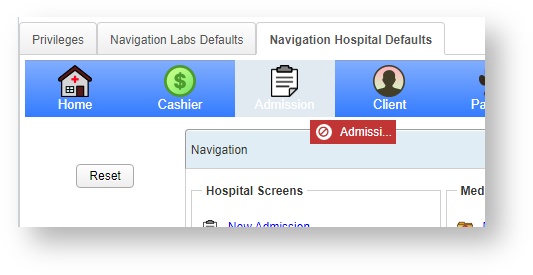
How do I remove unnecessary icons from the header bar?
For our cashier role, the primary screens they need to be on are the Cashier Screen, the Order Management Screen, and occasionally the Patient Record.
You can remove the screens from the header bar that these roles will not need on a daily basis. They can still access these screens through Navigation.
Grab an icon from the Header, and drag it back down to the Navigation section to remove it.
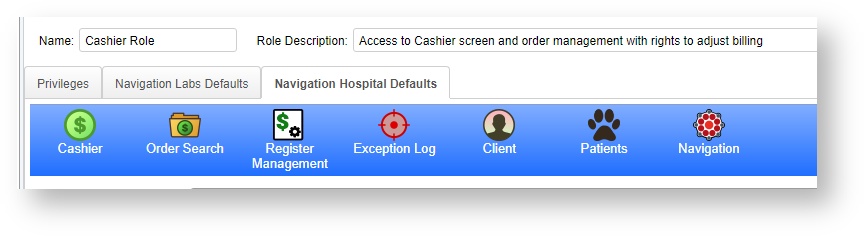
After removing all the unnecessary screens, the Cashier Role header bar will display like this.
Only the screens that the user regularly accesses will appear on the bar.
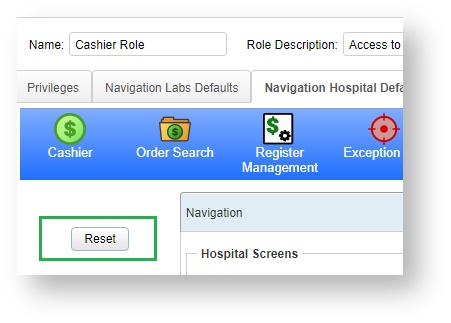
Can I reset and start over?
Yes. If you need to reset the header bar back to the default for the role, you can click on the Reset button to restore the default VetView header icons.
Can I still combine roles for users?
Yes. You can still add as many roles to users as necessary.
The header bar will automatically merge the two role headers based on the order of the icons for each role.
How do I allow individual users to customize their own header bars?
An individual user who encompasses multiple roles can adjust their header bar to match their preferences.
How do I determine which users can edit their Navigation?
This is controlled with the new privilege under User Profile to Edit Navigation. This can be assigned to roles for super users, or omitted for roles who need to have a fixed header bar, such as students.

How do I edit my Navigation?
Under the User Profile screen, you can find new tabs for Labs Header Buttons and Hospital Header Buttons.
Similar to the Role Setup, the individual user can drag and drop their most important screens from Navigation to the header bar, and rearrange the order.
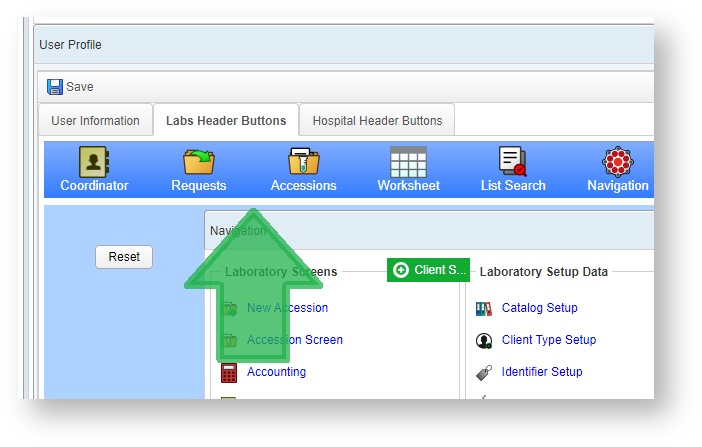
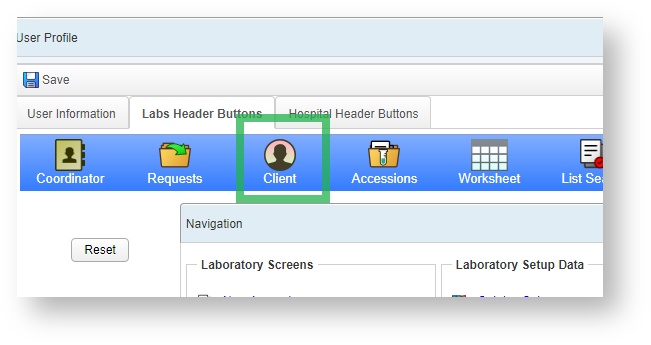
In this example, a Labs Receiving Tech has added the Client Screen to their header bar, as they may need to verify that the client has the necessary information to submit to external reporting such as NAHLN.
How can I create a custom link on the Header Bar?
For the first time in VetView with 4.0, it is possible to add a link to an external website to the Navigation bar, and the Header bar.
For our Hospital Cashier role, this means you can add a button to a third party payment processor or the hospital portal. For our Labs Receiving role, this means you can add a button to a VetView Quick Accession app or a lab portal.
This can also be used to add documentation to roles, such as instructions for students during surgery training.
How do I create a custom external interface?
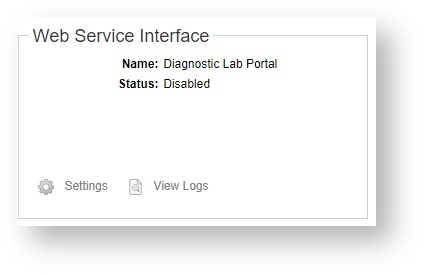
Under the Navigation Job and Interface Setup screen, click on Add Interface and/or Job and select "Web Service Interface" from the list. You can add as many external interfaces as necessary.
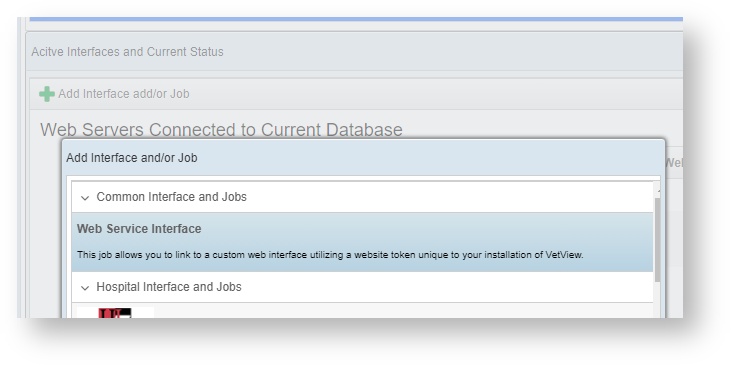
Fill out the form. Be sure to give it a clear name, as you can add many web service interfaces.
Token Key
For custom applications such as Lab Portals or Quick Apps, you will need to copy the Token Key and ensure it is embedded in the application itself for it to be able to talk to VetView.
For the purposes of creating a link on the Header bar to external documentation such as a student guide, the token key will not be necessary.
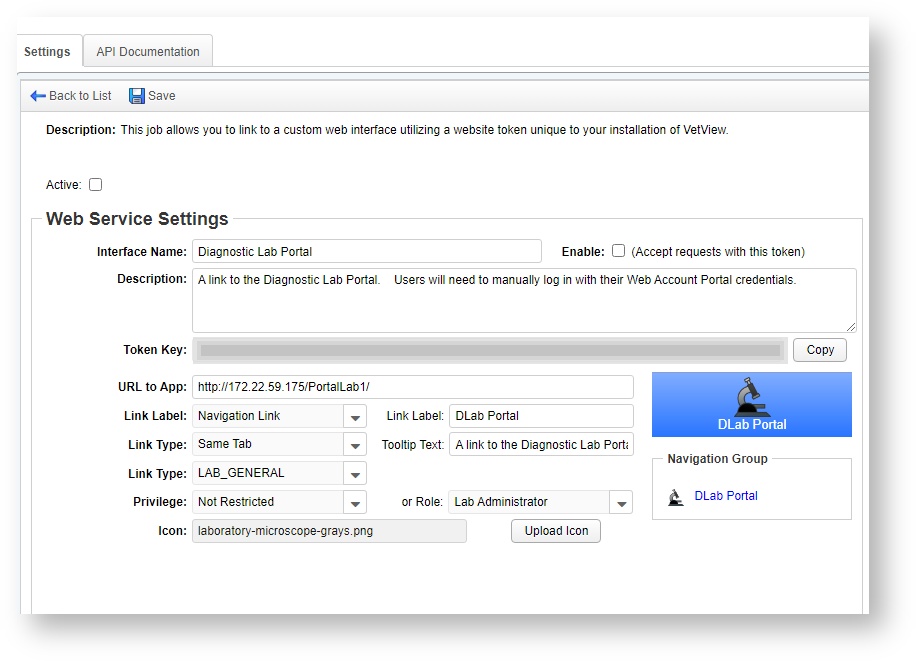
- The URL to App should be the web site you are trying to link to
- The Link Label determines if the website can be logged into using your existing VetView credentials. Quick Apps that use the VetView log in can be linked this way.
- No Internal Link means the web interface cannot be accessed via Navigation.
- Navigation Link adds it to your selected section under VetView Navigation.
- Navigation Link - PreAuthenticated adds it to the navigation menu, and also passed over the username and password of the logged in user, for Quick Apps.
- The Link Type determines if this should open in the same tab, or embedded in the VetView screen itself
- The Link Label is the text that will appear under the icon or on the Navigation menu
- The Tooltip Text is the text that will appear on the mouse cursor when you hover over the icon or the link on the Navigation bar
- The Link Type controls which section of Navigation this link will appear under.
- The link can be limited to specific privileges or roles if you do not want it to be available to all users.
- You can add a custom icon for this link. VetView will automatically resize icons of any size. We recommend a PNG of size of 256x256 pixels to ensure that the icon remains clean at all resolutions, and transparency.
When you have finished filling out your Web Service Settings, set the interface to Active for it to show up under the selected Navigation menu, and then click on the Save button to apply changes.
How do I make changes to my web services interface at a later time?
You can edit the Web Service Interface by clicking on the Settings button for the interface on the Job and Interface Setup screen.
How do I add my external interface link to a header bar?
If the custom link was added to all roles and all users, it can be added via any user profile.
If the custom link was restricted to a specific role, then only users with that role can see the link in their Navigation.
The hospital or lab administrator can also force that link to the header bar of all users with that role using the Role Management screen.
Drag and drop it like any other screen in Navigation to have it appear in the Header.
How do I change the Header Bar to become a pop up menu instead?
For users who are on smaller screens, VetView has added the ability to hide the Header bar entirely and replace it with a drop down menu.
This will free up screen real estate, allowing more of the main application to display.
Under the user profile, find the field labeled Navigation and choose the Popup Menu.
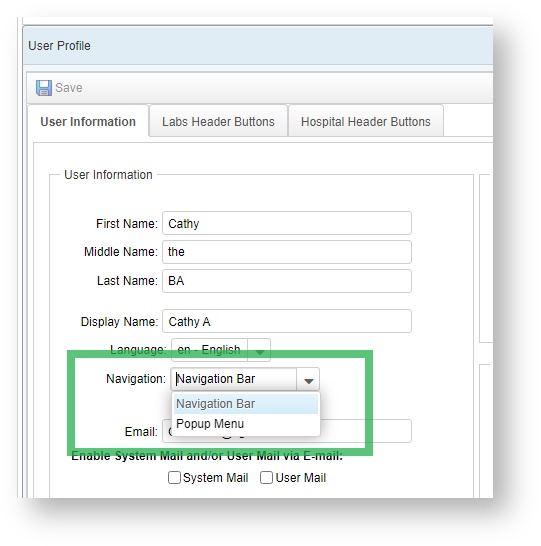
Click on the Save button. If you are the logged in user, the VetView Header will immediately be replaced with a "hamburger" menu icon in the upper corner.
Click or tap on this button to display the Header icons in a menu format.
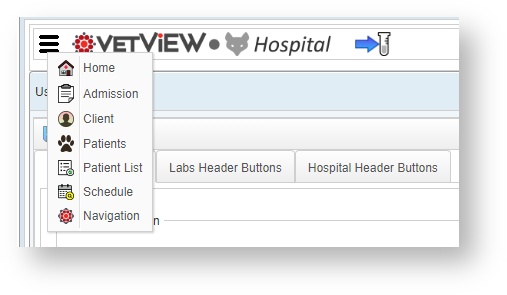
This change can be reverted at any time under the User Profile.
VetView Wiki Most recent releases of VetView: Version 5.0.2 and 4.2.8 Hotfix (Released 12/20/2024)
To see commonly used terms in VetView Hospital, please visit our Hospital Glossary of Terms.