How To Create a Batch Worksheet for a 96 Well PCR Test (3.1)
How To Create a Batch Worksheet for a 96 Well PCR Test (3.1)
In VetView 3.1, we released a feature that was beta tested at UGA for COVID testing of students, to support a 96 sample well plate layout for ThermoFisher Scientific or SmartSample PCR machines.
This method of data entry can greatly reduce the data entry time and risk of errors by supporting direct layout input, barcode scanning, CSV export and import, and automatic resulting of the tests.
How do I prepare an accession or tests for a 96 well batch?
You can add the tests to a single accession, or multiple accessions.
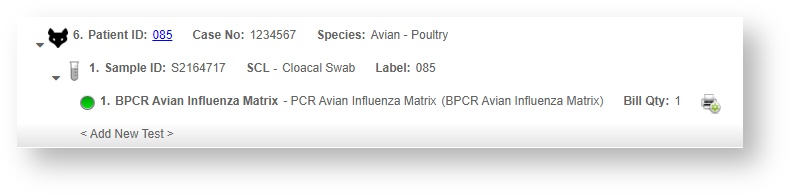
For a large batch of tests from a single source, it may be easier to do a single large accession. For example, an avian influenza test can be added in bulk for a flock of chickens from a single farm.
How do I create a large group accession manually?
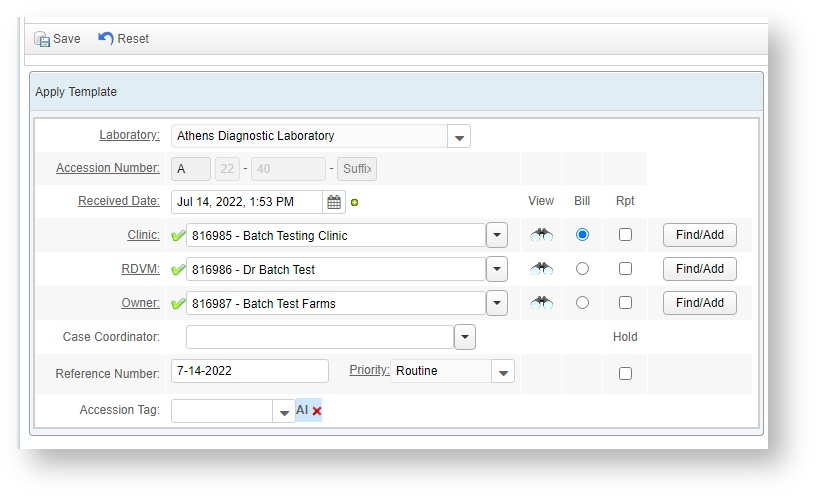
Create a New Accession on the Accession screen, fill in the client information, and click Save.
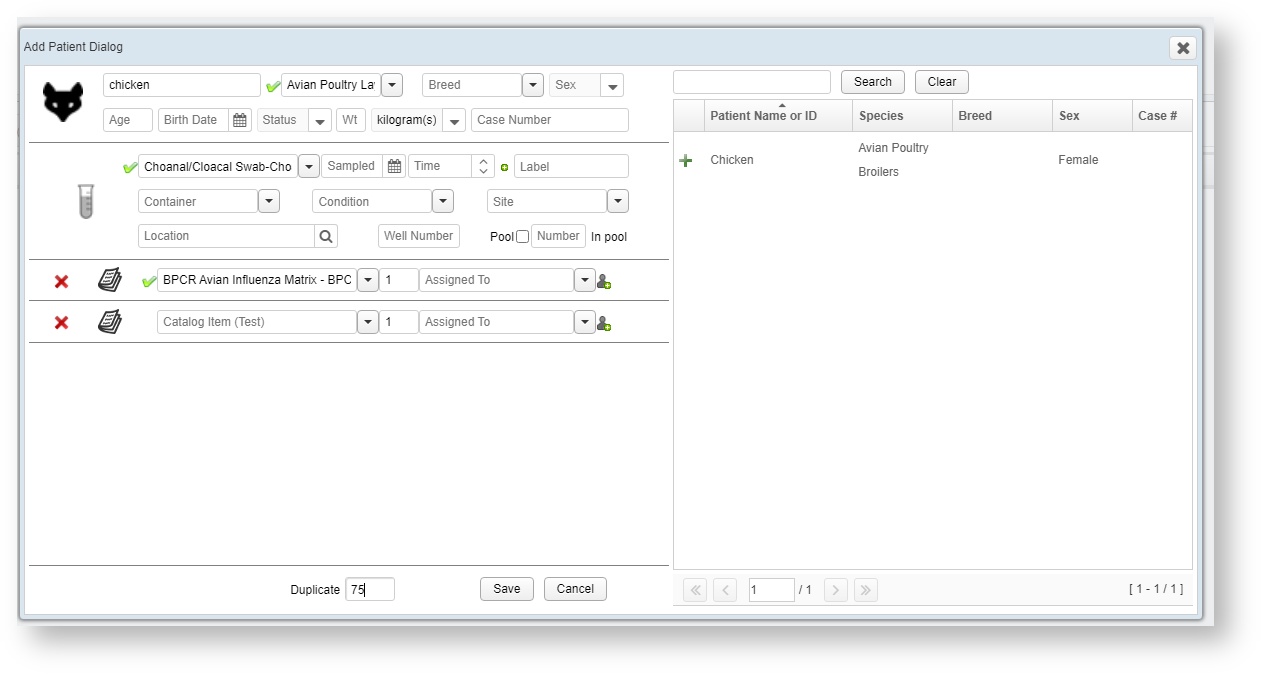
Start with Add Single Patient.
If the patient identifiers are arbitrary such as with a flock of chickens, and all that matters is that the specimens are matched to the animal, you can use the Duplicate feature.
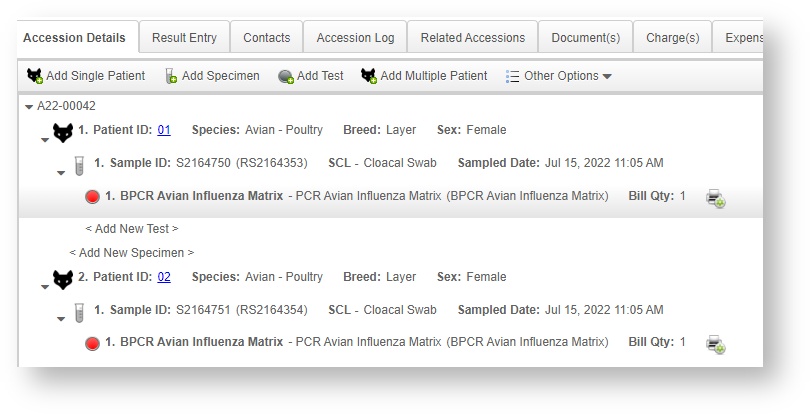
This flock has 76 chickens. We will create one patient, and then duplicate it 75 times to accommodate all the animals.
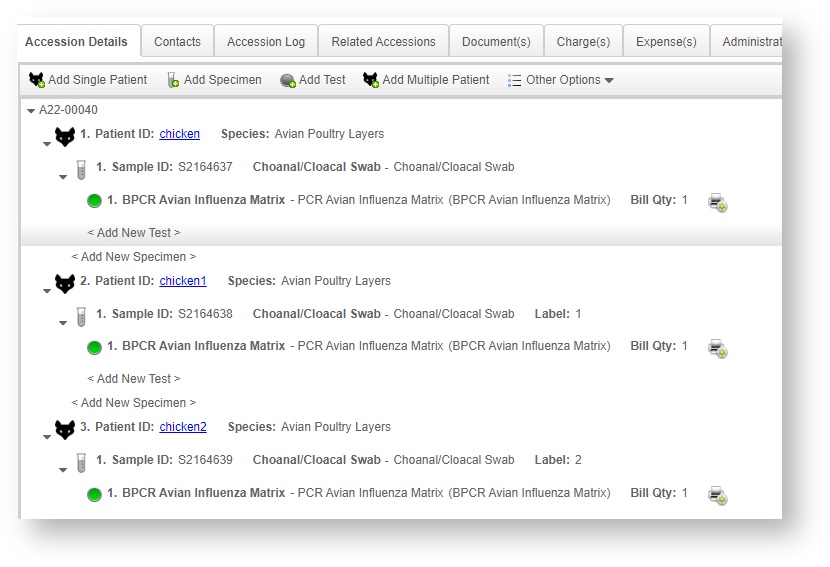
The system may take a few moments, but will eventually generate an accession tree with 75 patients, specimens, and the test to be performed on it.
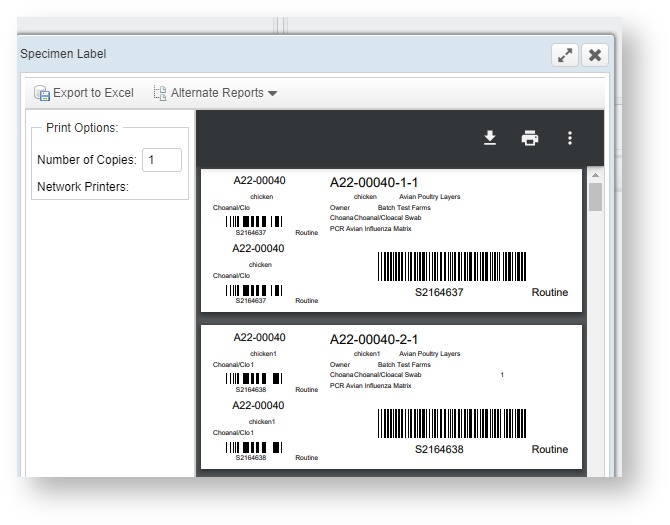
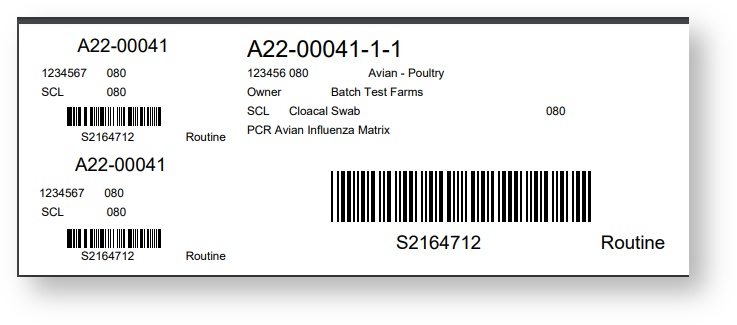
Print the Specimen Labels. This will generate the barcode label stickers to associate with each specimen, which should have the animal's actual identifier on it already as part of the sample collecting process (e.g. the patient's ID tag.)

A PDF intended to be sent to your label printer will open, and you can print these and apply these to the containers.
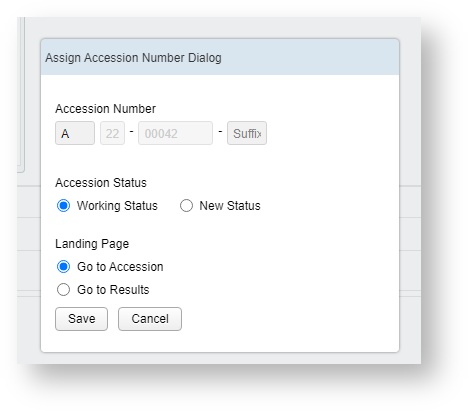
Once all the specimens have been labeled with the bar code, you can Release the accession, which will change it to working status, and indicate it is ready to be processed at the PCR workstation.
Linking each specimen to a well will occur at a later step.
Alternate Method: Import from CSV File
If you have data for the patients with the patient identifiers already created, you can import this data from a CSV file. (Comma Separated File, an option to export from Excel or other spreadsheet software.)
The Import feature will match the columns in your file to available data types in the system.
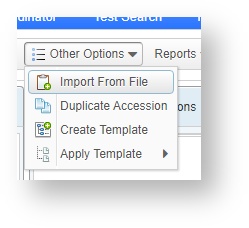
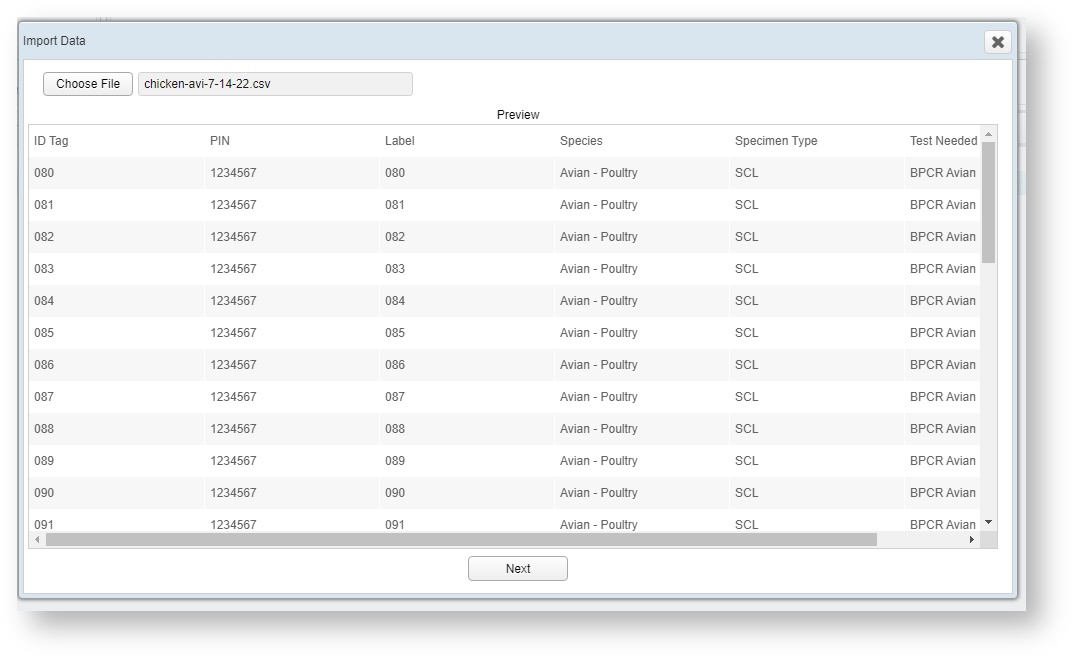
Choose the file. VetView will verify that it can read the file, and give a preview of the data it detects.
Click the next button to match columns to the data type VetView can import. Note that at a minimum, you must have a Patient ID column and a Species column; VetView can allow you to enter and duplicate the other information using Edit Multiple Patients.

Once all the columns are mapped and the minimum information has been entered, you can click the Next button.
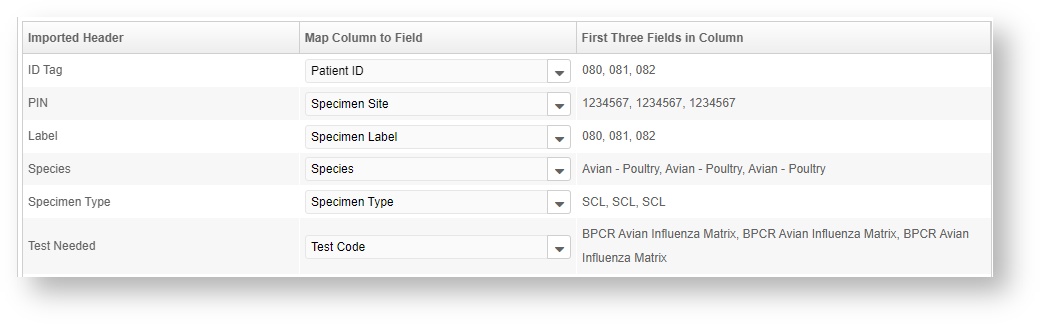
If VetView runs into any issues during the import process, it will issue a warning. In this case, the PIN being set as a Specimen Site is not valid - the Processor ID Number is not needed, although may be helpful for tracing outbreaks. Change it to Patient Reference Number instead to keep it associated with the data set.

One final preview of your data will appear before the import process is complete. This is how VetView will create the accession tree.
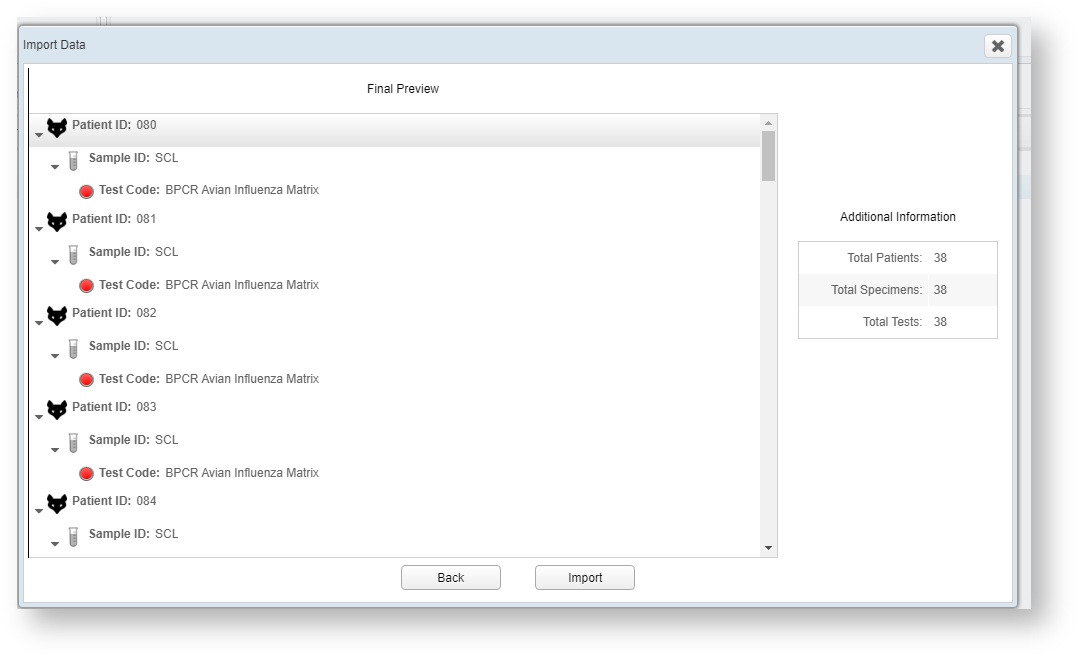
VetView will automatically generate the Sample ID numbers for each patient based on the spreadsheet data entered, and associate it to the Sample and Label for each patient.
Then you can print the Specimen Labels bar codes, and match each printed label to the appropriate pre-labeled sample.
How do I process a large request from my lab's Web Portal?
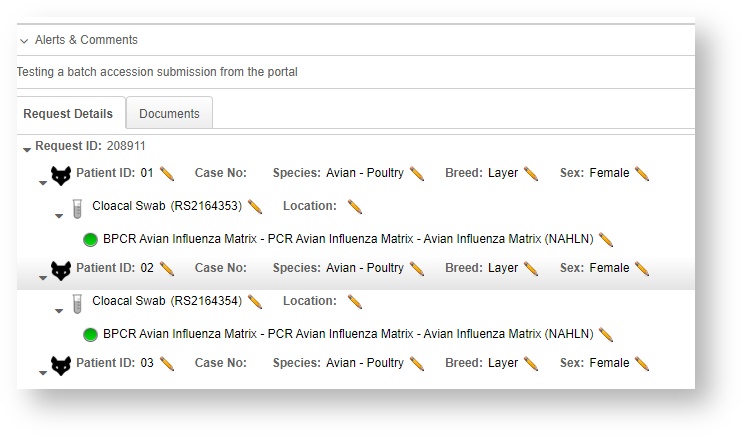
With VetView 3.1, we can support group patient testing requests submitted through a lab portal or a custom web form.
The users will need to enter in the request using the Create New Request form. See How to Request a Test from the Labs Portal (VetView 3.1) for the steps on that process.
In VetView, the Request will appear in the list for processing under the Request screen.
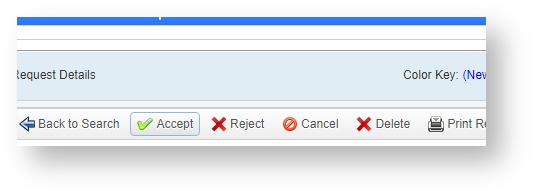
Accession Receiving should verify that all the samples are provided and clearly labeled before accepting the request to start processing the accession.
Click on Accept Request if all the required information and specimens are included. If a specimen is missing, you can cancel the test individually on the accession but process the rest of the batch, per your lab's protocols.
If any required information is missing, or samples were damaged in some way, you should reject the request according to your lab's protocols.
Once accepted, you can set to the accession to New Status if you want to label the samples first before releasing the accession, or Working Status if you will complete the specimen labeling while the accession is open.
The Accession Screen will open like normal, and each patient and its specimen will appear in the Accession tree.
How do I create a new worksheet?
The 96 well plate reader runs off VetView's Worksheet Feature. This lab feature will generate a set of work to be performed, based on the accessions to be done for a given test or at a specific workstation.
In VetView 3.1, the previous Navigation Worksheet screen and the List screen have been combined into a single unified Worksheet Screen.
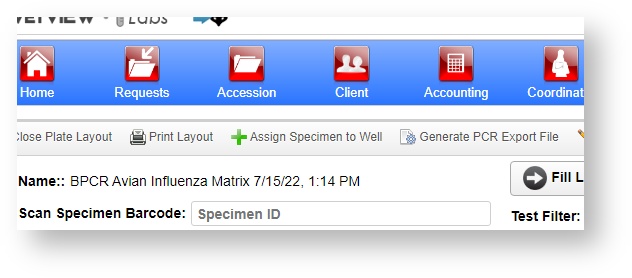
This can be found at the top of the Header bar, as Worksheet.
This can also be accessed under Navigation.
There are two ways to create a worksheet: From the Worksheet screen, at which point you will need to manually add the tests, or from the Test Search Screen.
How do I create a worksheet from the Worksheet Screen?
From the Worksheet Screen, click on the Create Worksheet button.
A small window will open that allows you to configure the Worksheet to match your workflow.
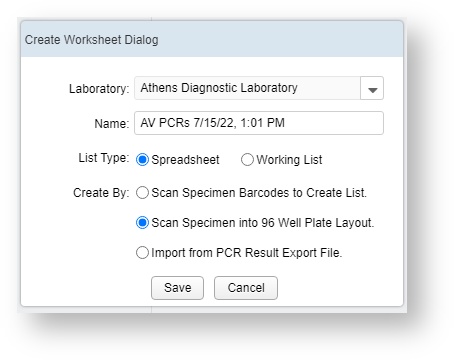
Select the lab. The date and time will automatically load into the Name of the worldsheet to guarantee it will be unique, but you can also name it based on the work that will be performed to help you find it later.
- A Spreadsheet style is intended for tests that can be performed simultaneously, such as the 96 well plate tests or other tests that are performed in batches for multiple patients at a time.
- A Workling List is intended for tests that must be performed consecutively and processed one at a time, such as histology or bacterial cultures.
The other set of options includes how you will select the tests to be performed:
- Scan Specimen Barcodes into the a spreadsheet to create the list
- Scan specimen Barcodes into the 96 Well Plate Layout
- Import from a PCR Result Export File (if the accessions, test, and specimens were entered directly into an external machine, and you did not have a worklist set up for the results previously.)
Click on the Save button to generate the Worksheet and load the Plate Reader screen.
How do I create a worksheet from the Test Search Screen?
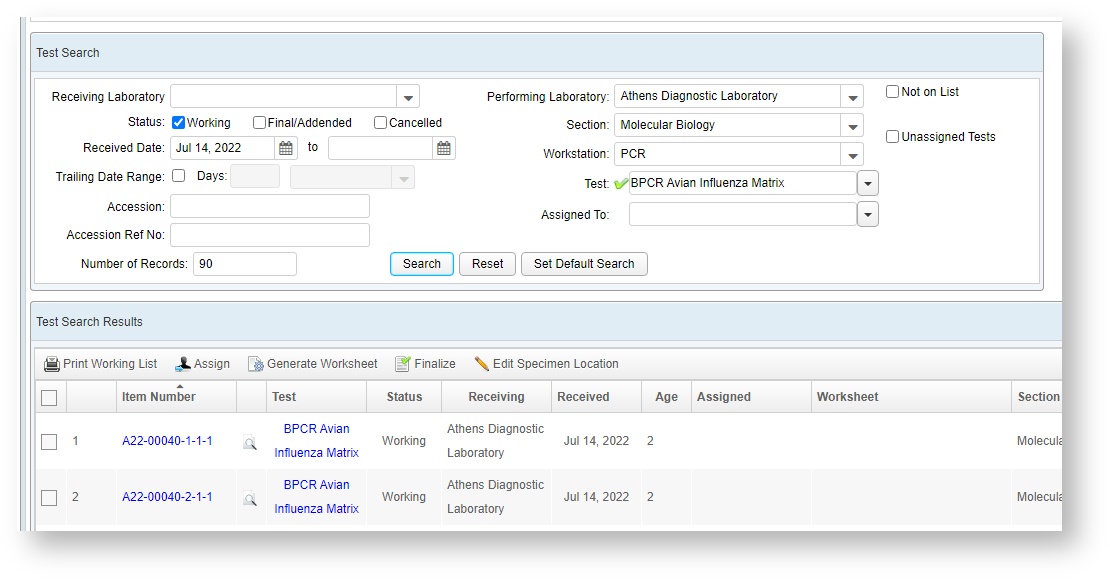
If all the tests to be performed on the Worksheet are identical, you can load the tests and accessions by going to the Test Search screen instead.

On this screen, enter in the search parameters for the tests you want to perform. In this case, we need the BPCR Avian Influenza Matrix accessions that were released in the last day, in Working status.
You can limit the number of records to the maximum amount of work you can perform in a batch. For a 96 well plate reader, this will likely be 90 total tests.
The Search Results will load in a list below.
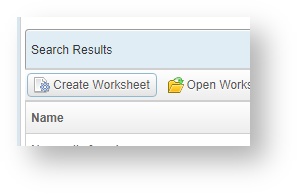
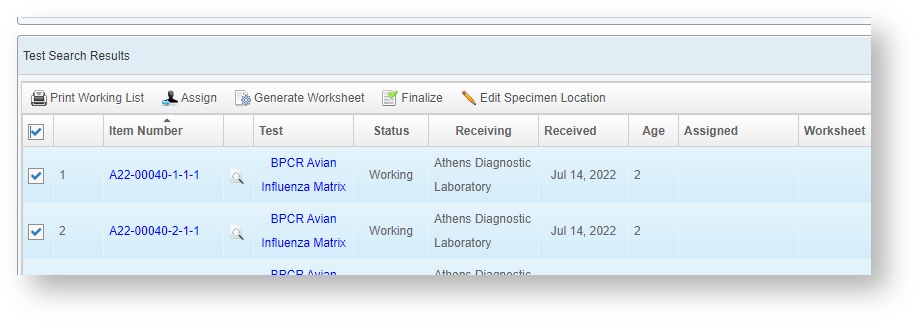
Click on the square underneath "Print Working List" to select all the displayed matching search results. Then click on Generate Worksheet to open the worksheet dialog box.
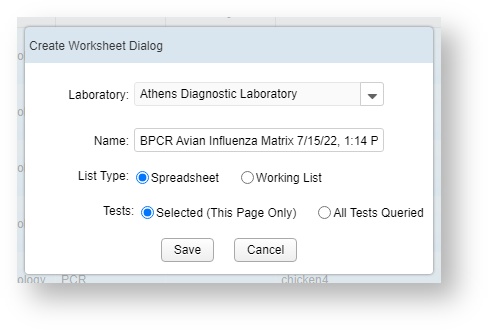
On the worksheet dialog box, you have the option to select the performing lab, give the worksheet a unique name, and choose whether to limit the results to the number of records you set at the top (this page only) or include all results.
Unlike the Worksheet screen, this screen will automatically name the worksheet after the test you searched for, as well as including the date and time stamp.
Since the PCR machine can only handle 90 specimens, we will continue with the Selected option.
Switch to Plate Layout
Both methods of worksheet creation will allow you to change to the Plate Layout later for additional data entry.
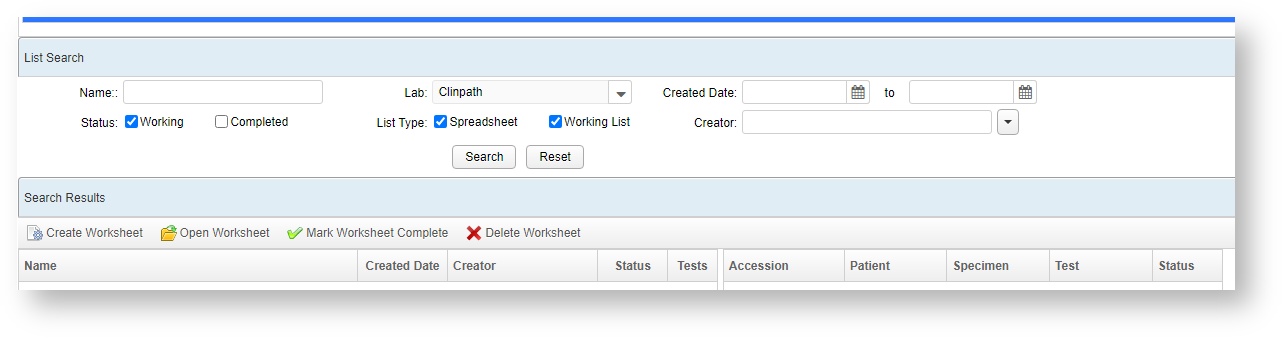
How do I find my worksheet?
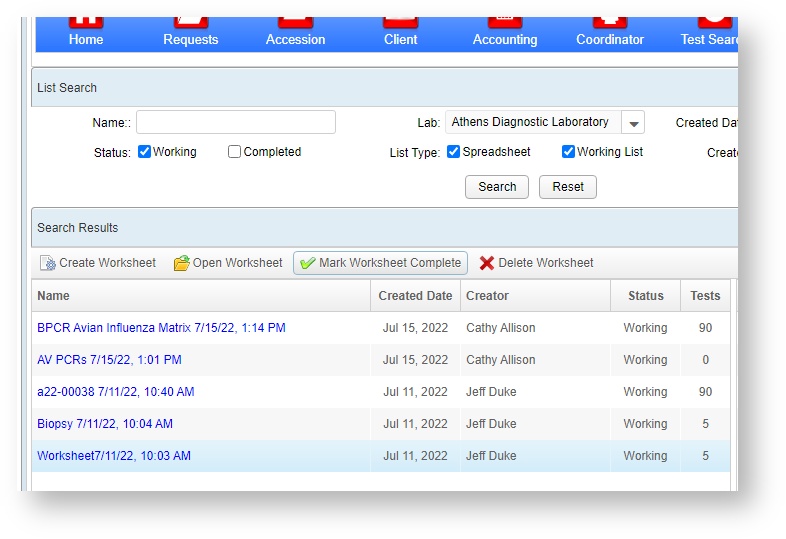
You can search for existing worksheets you already created on the Worksheet screen.
If the worksheet is new, the easiest way may be to search by Created Date, and then look through the results to find your worksheet.
You can also filter your own worksheets by entering your name in the Creator box, to separate them from worksheets made by other people in your lab.
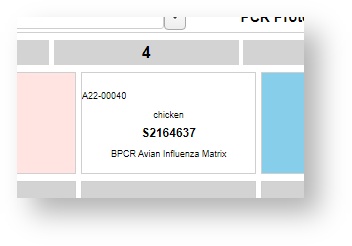
How do I enter the specimens, tests, and accession data for each well?
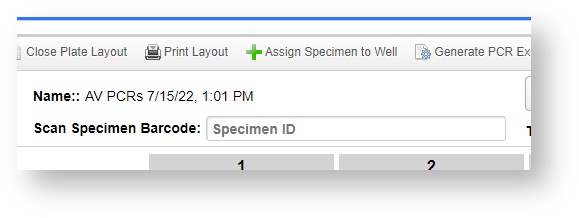
Once you have created your worksheet on the Worksheet Screen and selected the Plate Layout as the option, the Plate Layout screen will load.
This screen is allows you to select a well on the grid, and enter the data quickly, as opposed to tabbing through. Once a Specimen is entered into a cell, the next cell will immediately load, allowing you to continue scanning without having to touch the screen again.
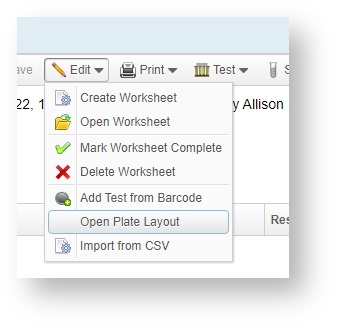
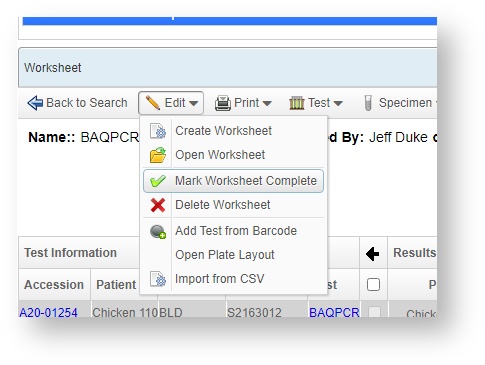
On a regular Worksheet, you can switch to this by going to the Edit button and choosing the Open Plate Layout option.
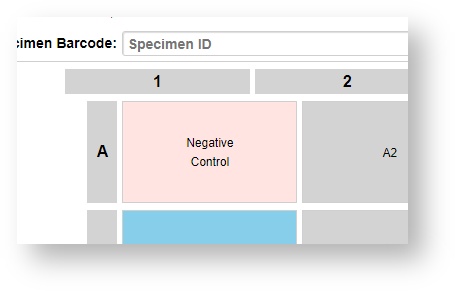
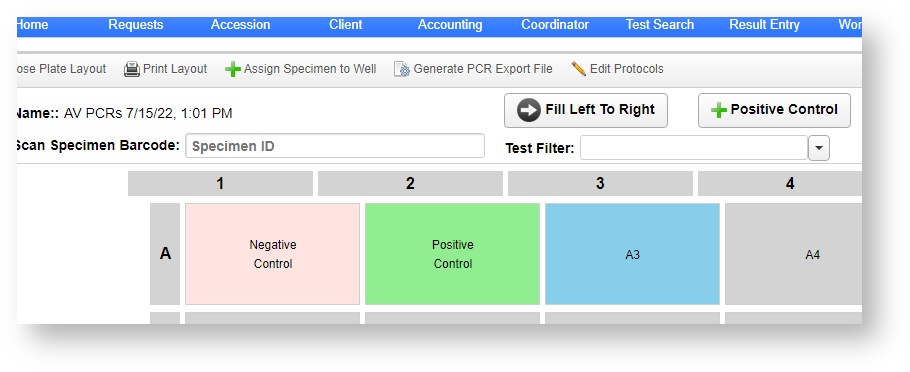
How do I set my controls?
To set a Negative control, select the cell that will be your control and click on the Negative Control button at the top.
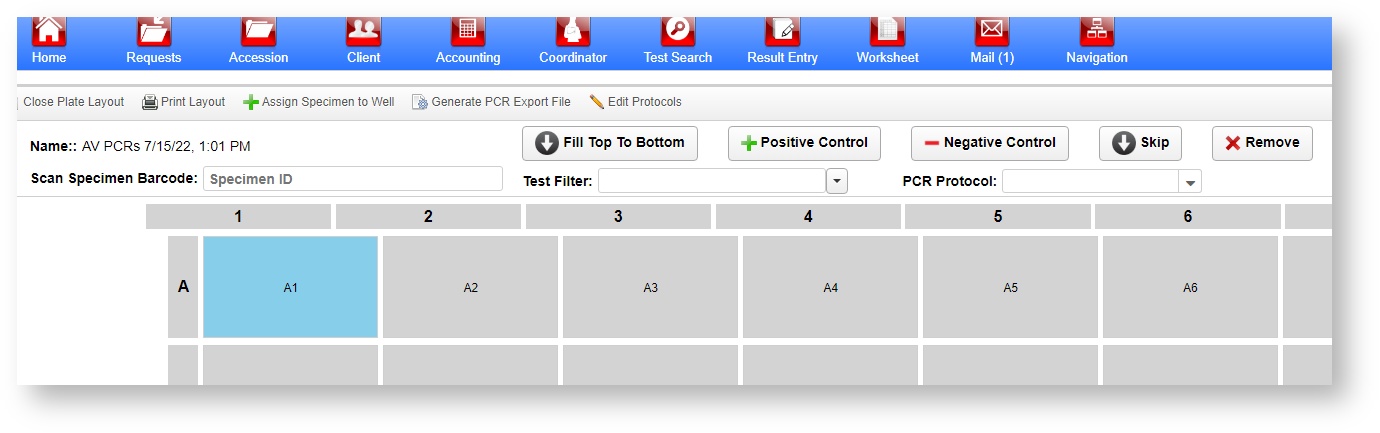
The cell will change over to a negative control.
You can do the same for the Positive controls using the Positive Control button.
These can be set to the standard locations based on your machine's recommendations and your lab's protocols.
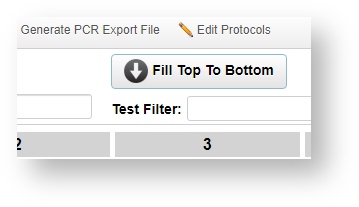
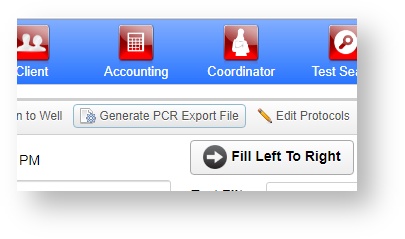
How do I change the fill direction?
You can toggle between Fill Top to Bottom and Fill Left to Right by clicking the button. The display is the current direction it will fill. You can change directions at any time without losing data. The next open cell from the last one entered will automatically get filled.
How do I start scanning my barcodes?
Make sure the cursor is in the Scan Specimen Barcode and then scan the VetView Specimen barcode label. The specimen number will load, and VetView will link it to the corresponding accession and test.
Clicking on a given cell will also automatically place the cursor in the barcode field.
Scan the barcode. The number should automatically fill in. If your barcode scanner has an entire key pre-programmed, it will jump to the next cell, or you can press the enter key on the scanner itself to move to the next.
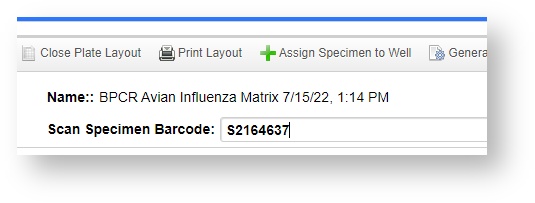
VetView will search for the specimen, and then link the associated accession, patient, and specimen to the cell.
Continue until all the cells have been filled in. VetView will issue a warning if a specimen was entered twice, or if there is no specimen or accession found with that ID number.

Remember to include negative and positive controls in the wells per your lab's protocols.
How do I assign a specimen to a well if it was already linked to the worksheet?
If you do not have a barcode scanner, you can find the specimens associated with the accessions on a worksheet by click on Assign Specimen to Well.
Only specimens that are not yet on the plate layout will appear in the window. Double click to add it to the next cell after verifying the labels match.
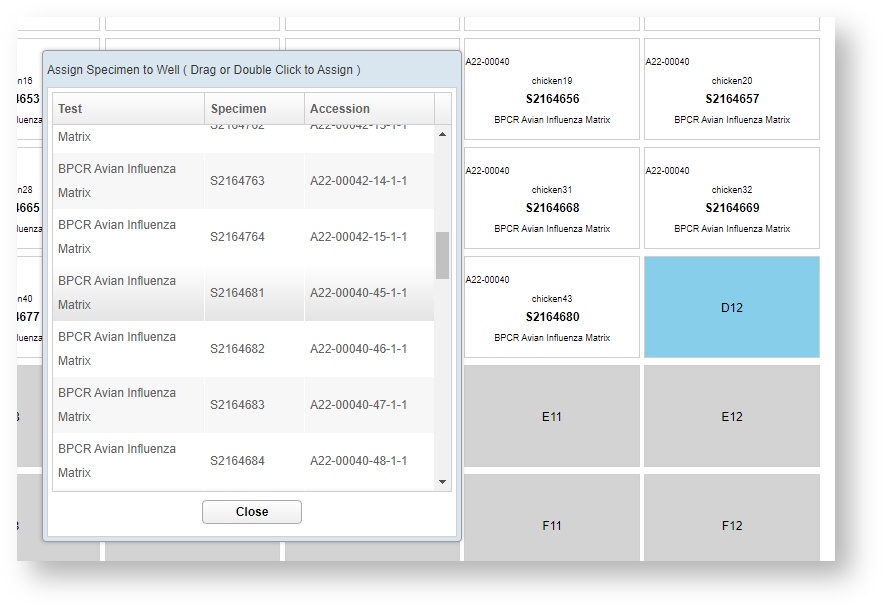
The specimen window will remain open, but the plate layout will automatically jump to the next cell, allowing you to quickly add the specimens to the layout once you verify the specimen ID matches the sample on the physical tray.
How do I export and import the machine data?
VetView will automatically build an export file for the PCR machine you are using. Click on Generate PCR Export File at the top of the screen to start.
Select the file format and the Default PCR Protocol. (If you do not have a PCR protocol available yet, contact your Lab Administrator for assistance setting it up. This can be done under the Edit Protocols button at the top.)
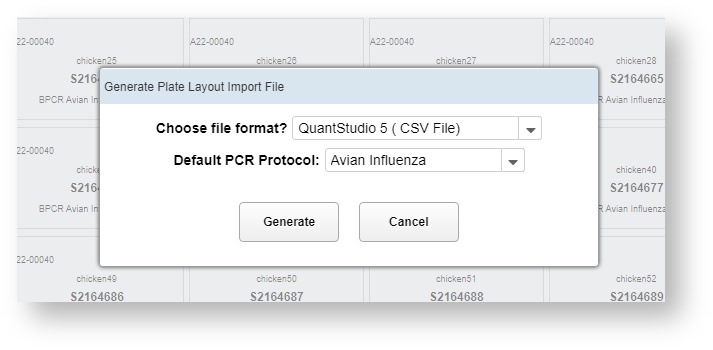
The CSV file will automatically download to your PC or tablet's Downloads folder. Copy this file onto a USB drive to load it into the PCR machine, or add it to a network storage location where you can find it for that machine.
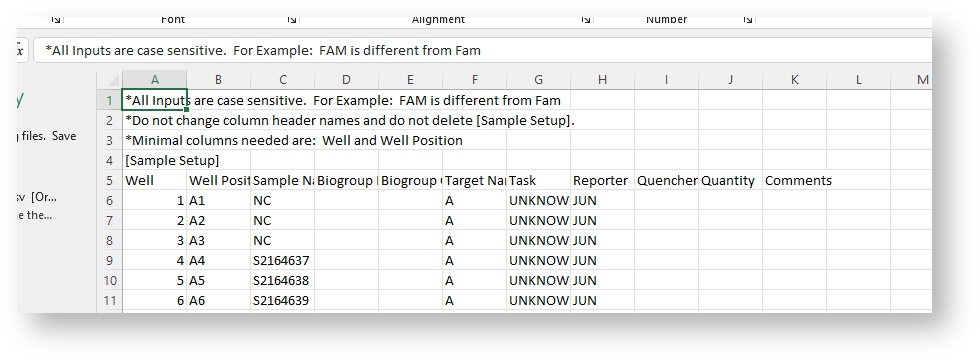
The file, when open in Excel or another spreadsheet program, will look similar to this, depending on the machine and the protocols:
Load the CSV file into the PCR machine, complete any additional setup steps required by the machine, and run the thermal cycles.
When the cycles have completed, save the data back to the USB or network storage drive.
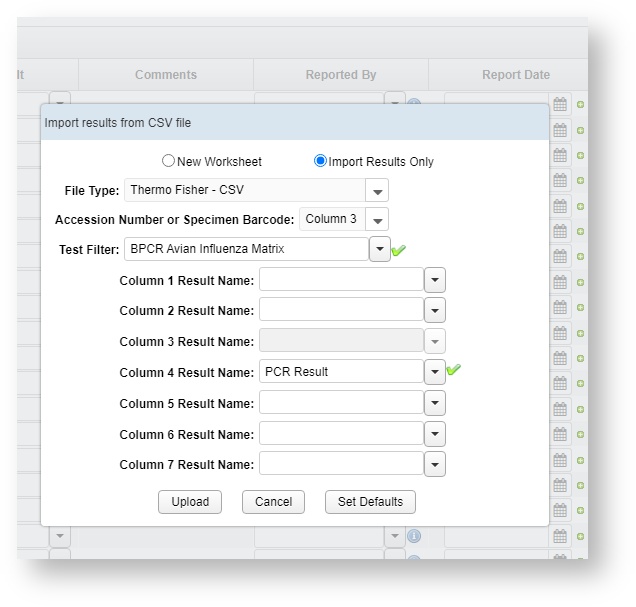
You can then Import from CSV on the Worksheet screen. Make sure to match the columns based on the output of the PCR machine that you used.
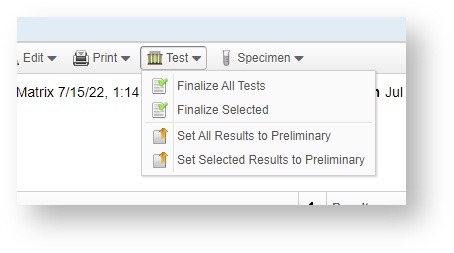
How do I mark my worksheet as complete?
On the Worksheet screen, if all tests have been completed, set the tests to Finalized. When all Accessions have been finalized on a Worksheet, it should automatically mark as complete.
You will be prompted to save changes first.
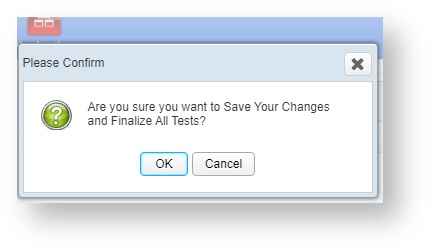
You can also manually mark the worksheet as complete by selected Edit > Mark Worksheet Complete.
You can also mark a worksheet as complete on the Worksheet Search screen by selecting the row with the worksheet, and clicking on Mark Worksheet Complete. This is useful if you do not need to review any of the results on an older worksheet.
VetView Wiki
Most recent releases of VetView: Version 4.1.3 Hotfix (Released 2/16/2024)
Glossary
For more information on common terms used in VetView, please visit the Labs Glossary.
Contents