Accession Screen
- Anonymous
- Cathy Allison
- Andrew Hanneman
Accession Screen
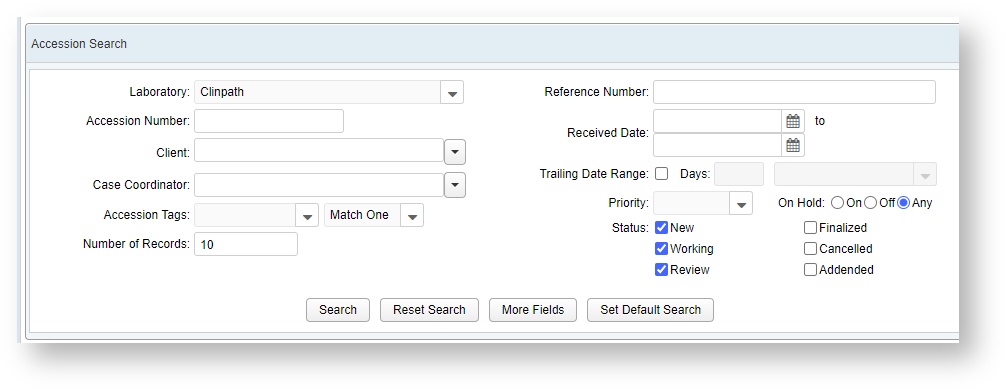
Accession Search
The Accession Search window allows you to search for a specific accession, or build out a list of accessions for bulk actions.
You can search by lab, by client, by case coordinator, by received date, or by Accession status.
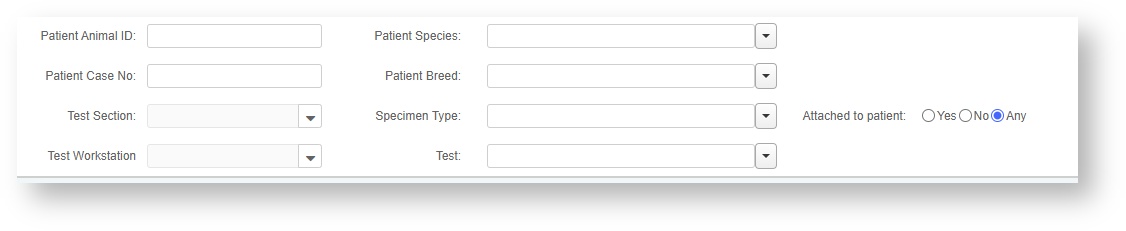
More Fields
More Fields on the Accession search window gives additional options. In Version 2.0.7 we added the ability to search by whether a Specimen is attached to a patient, to find any specimens and their associated accessions that may be incomplete.
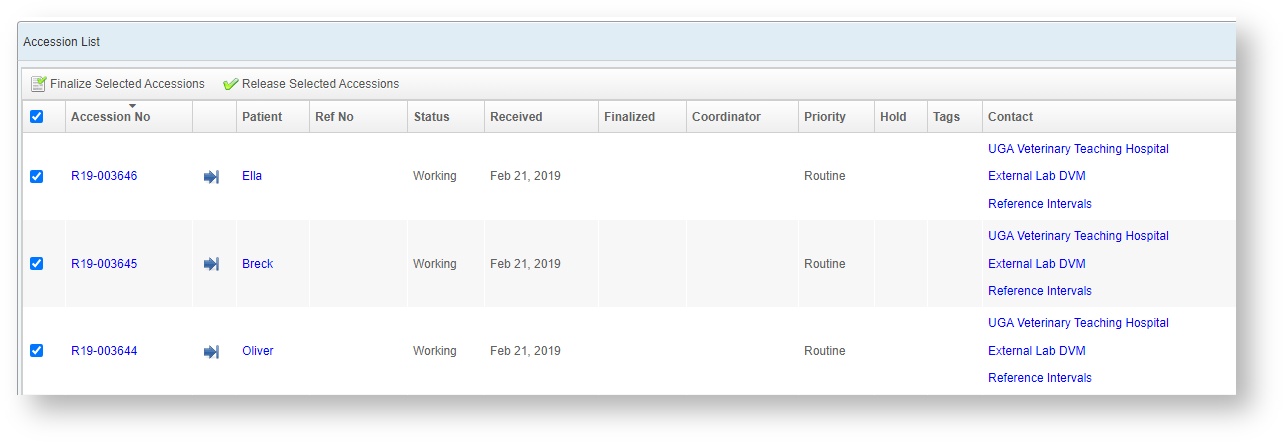
Accession List
The results from the Accession Search will output into the Accession List. If you have the privilege to Finalize Accessions for a lab, you can click on the "all" check box at the top of the counter, or individual accessions, and the option to Finalize Selected Accessions will appear at the top.
If the Accessions are in a New status, you can select them and Release Selected Accessions.
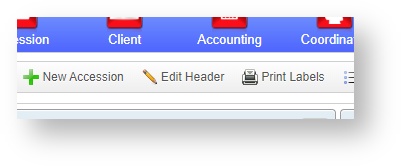
New Accession
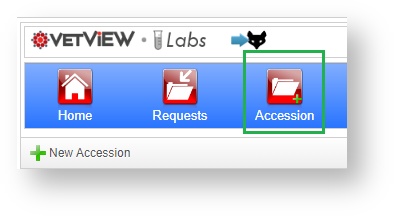
At the top of the Accession screen, click on the New Accession button to start creating a new accession. Use this process for requests that come in via a manual submission process in accession receiving (e.g. a box of samples with bar codes and paper information from an unaffiliated external lab.) You can also shortcut to a New Accession and bypass accession search entirely by pressing the Alt key and then clicking on the Accession button in the header.
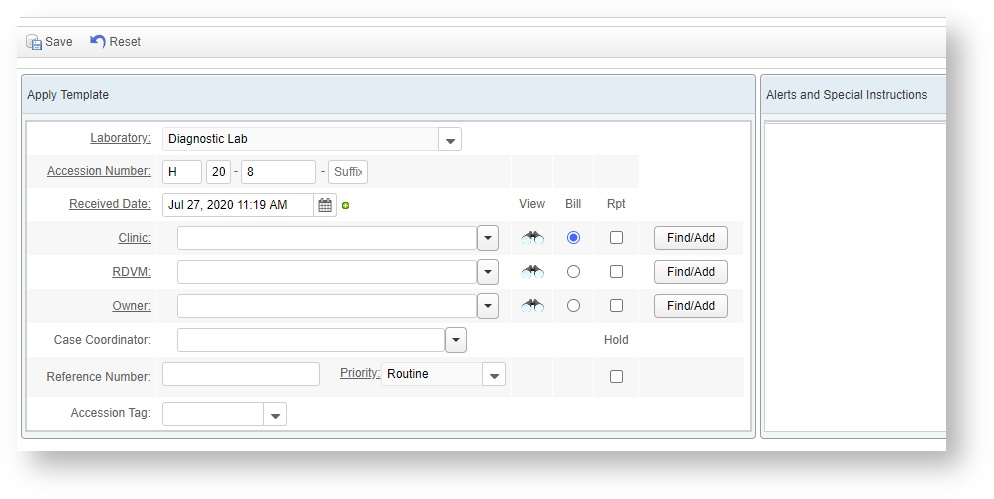
Apply Template Window
Select the lab for this Accession. This will load the header template that was previously set up for the lab, and allow you to enter the information needed to create the accession. If you have a designated Default Lab under your user setup, then that lab will pre-load on this screen.
The Accession Number will automatically pre-load, and may or may not be altered depending on your lab setup.
The Received Date can be time stamped to now, or changed to a prior date and time if needed.
Depending on Lab Setup, the template will ask for Clinic, Owner, RDVM, or other demographic information. (Human testing setup can be prompted to ask for Patient and PCP instead.)
If your lab workflow utilizes a Case Coordinator it can be assigned here. You can also enter a reference number (which can be searched on later), such as the submitting lab's tracking number, set a priority, add Accession Tags for research, and set the Accession to Hold if there is additional information needed to process it.
Click on the Save button at the top to create the Accession and jump to the main Accession screen.
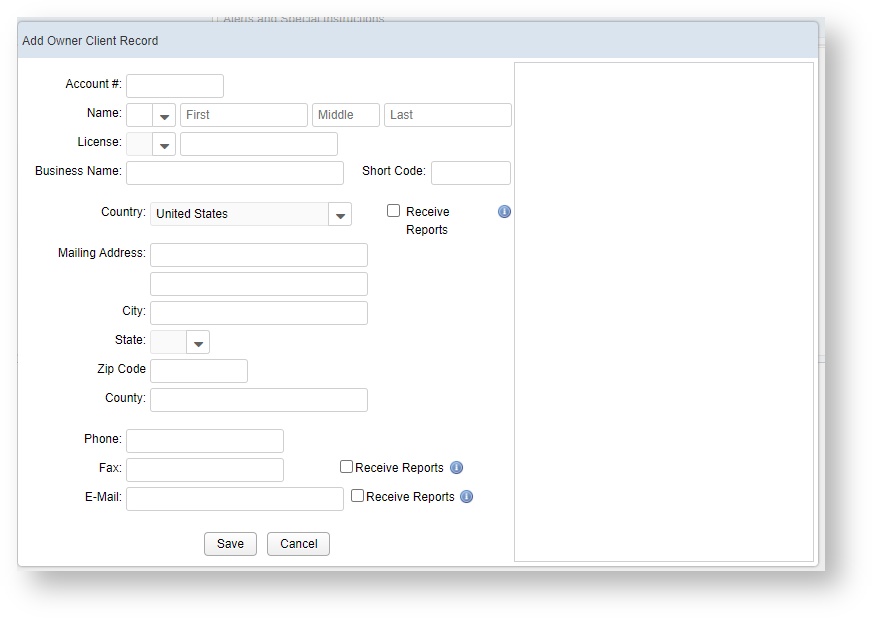
Find/Add Client
If you have a new client that is not in the system, click on the Find/Add button to open a new client window. Enter in the information and click on Save.
As you tab through this window, potential matches will appear on the right hand panel.
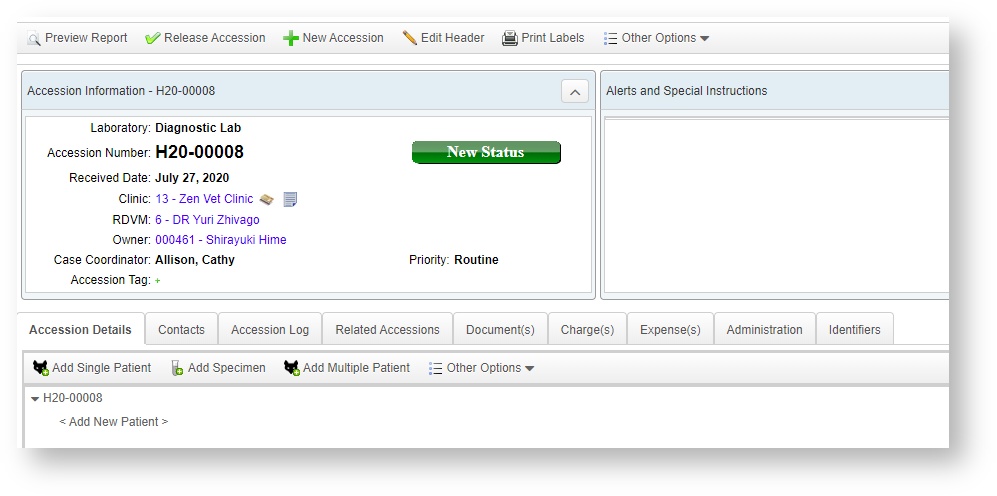
Accession Information
When a new Accession is created, it will be in New Status. (Accessions that come in from Requests can be set to jump straight to Working status if there are no errors.)
At this point, you are ready to add Patients, Specimens, and Tests from the catalog to the accession.
Accession Statuses
Accession Statuses
Accession statuses in VetView follow a standard workflow. Some steps can be skipped or are optional, depending on lab setup.
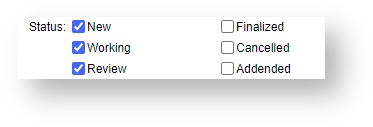
- New Status: An accession that has been started but not yet Released. An Accession remains in this state while the header, patient, specimen, and test information is added in. To transition to the next status, click on Release Accession at the top of the New status accession screen.
- Working Status: An accession that has been released. The accession is assumed to have been sent to the workstation where the tests will be performed.
- Review Status: An accession that been completed by the lab technician and is ready to be verified by supervising faculty or the case coordinator.
- Finalized Status: An accession that has been reviewed and confirmed completed.
- Cancelled: An accession that was cancelled, either by the lab internally or by the requesting client.
- Addended: An accession that was marked as finalized, but had revisions or corrections performed on it.
Edit Header
If any errors were made during the initial creation of the Accession, or were sent in incorrectly with the Request, you can go back and change that information by clicking on Edit Header. This is also where you can put an Accession into Hold status if there is a reason it cannot be processed right away.
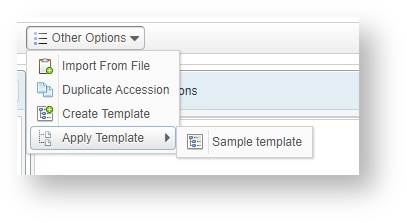
Other Options
The Other Options menu on the Accession screen has options to Import from File, Duplicate Accession, Create Template, and Apply Template.
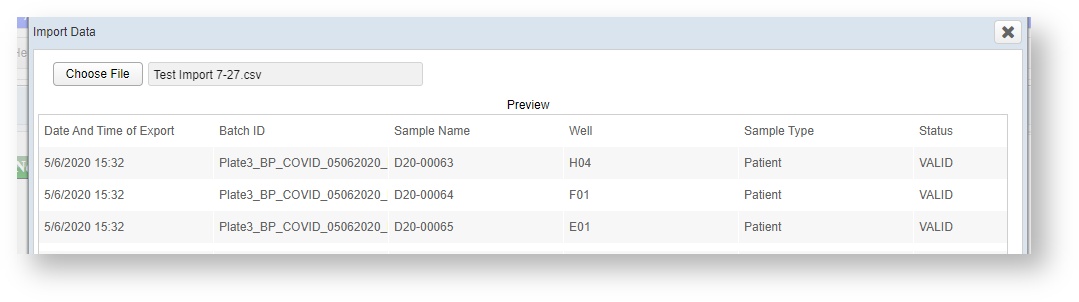
Import from File
This wizard walks you through the steps of importing an accession from a CSV (comma separated value) file.
The CSV file can be created/edited in something like Microsoft Excel. A submitting lab can pre-build their accession data in this manner instead of relying on a paper report, or you can use this workflow to quickly enter the information in Accession receiving before starting the new accession process. If you name the headers to the columns appropriately, VetView will automatically figure out where to put the data. This first step of the importation wizard lets you choose the file to upload (.CSV only) and then displays a preview of the data in that file.+
Be sure to strip out any extraneous data that is not part of the import process while editing the CSV, as there is no way to remove it from within VetView.
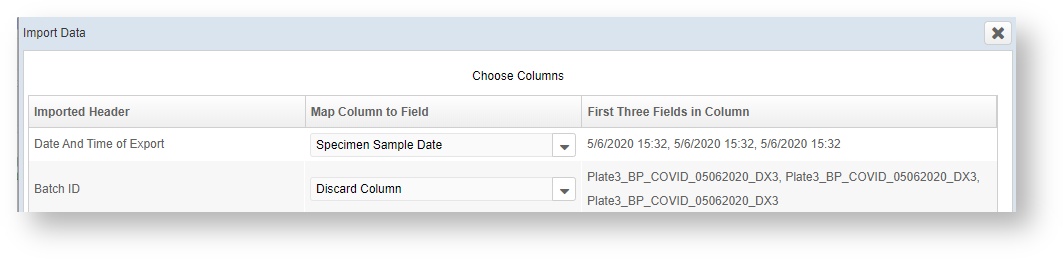
The second step is to pair the column header names with the names of the pieces of data in VetView. As mentioned above, VetView will automatically pair the columns if they share a name with the internal data type. If there is no match, or it is the wrong match, you can manually associate a column with a piece of internal data by using the drop-down boxes. If a CSV column is not needed to create the Accession, you can tell the import wizard to Discard the Column.
The third step gives the user the option to edit the CSV's data right inside the importation wizard. It will also display any data validation errors that need correcting before the importation can proceed.
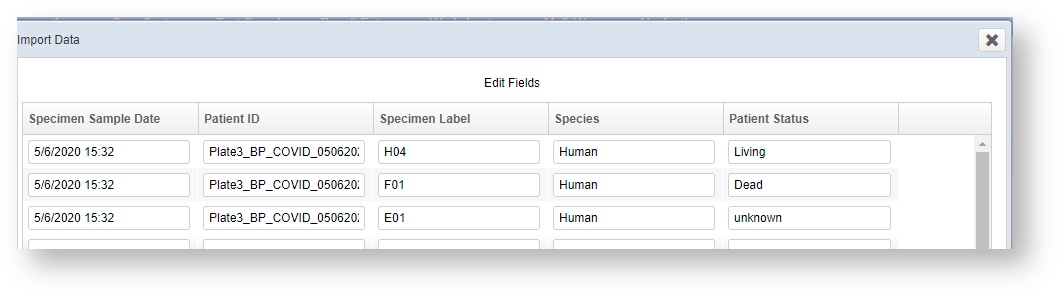
The forth and final step shows the user a preview of the imported data and displays some summary information about the number of patients/specimens/tests imported.
Pressing the Import button here will append all of the chosen CSV information into the accession.
Accession Details Tab
This tab is used to build up the accession with patients, samples, and tests.
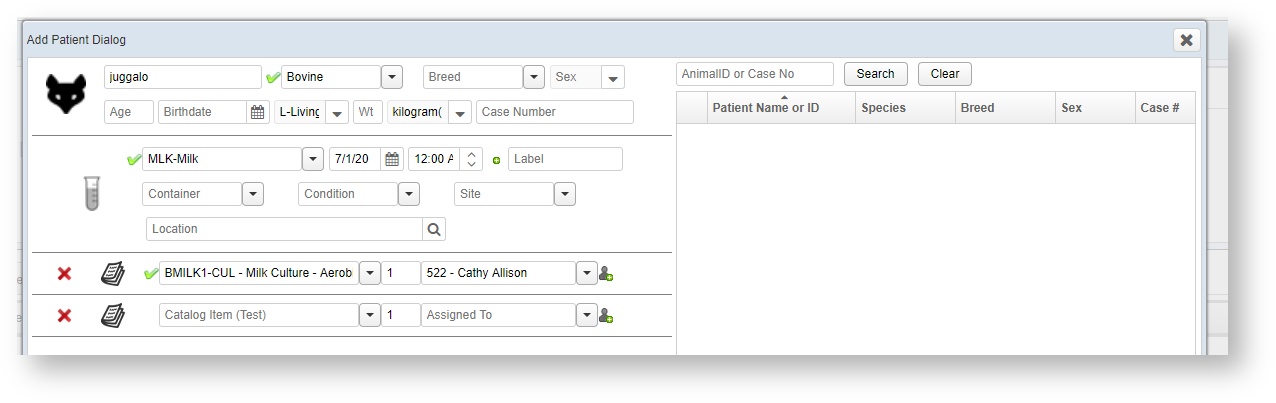
Add Patient / Specimen / Test Window
Enter in patients, specimens, and then the test to be performed on the specimen Existing patients can be looked up using the Animal ID / Case Search. As of 2.0.7, specimen locations can be entered as well (e.g. "Main Refridgerator") and then tracked and moved appropriately with the workflow.
Note that certain tests may have a restriction on the allowed specimens - blood based tests may throw a warning if a non blood specimen was entered.
Result Entry Tab
This screen is used to view and enter test results. Results are highly customized depending on the type of test requested. As such, the workflow for each test will be different for each technician, and the look and feel of each accession will be unique to the tests on it.

Test Statuses
Test Statuses
Individual tests in VetView can have their own statuses within the accession. This allows you to work through all the tests one at a time.
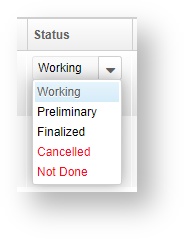
- Working Status: The test is ready to be performed.
- Preliminary Status: The test has been performed and is ready to be reviewed.
- Finalized: The test has been reviewed and confirmed accurate.
- Cancelled: The test was not performed because the requesting lab cancelled, or it was cancelled internally.
- Not Done: The test was not performed for a reason other than cancellation (invalid sample, not relevant to species, etc.)
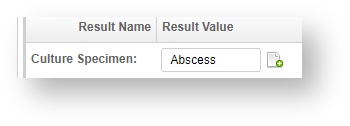
Result Entry Macros
Some results have predefined macros that can be used as a shortcut. This is especially helpful for fields that don't necessarily need a value list, but also may only have a limited number of answers, or for longer texts of paragraph.
Click in the icon that looks like a plus sign over a document to open the Macro window. (The shortcut Alt+V will also open this window when the cursor is inside that text field.)
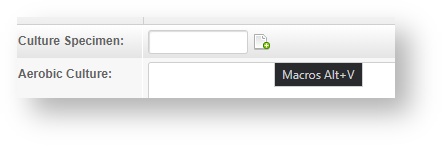
From the window, double click the macro you want to select. You can also make new macros if you have the privileges to do so, and the value you want is not available.
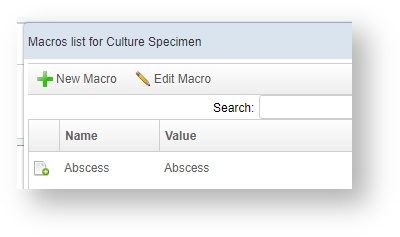
After double clicking, the macro text will load in the field.
Result Entry Result Sets
Result Sets are a way of using predefined lists of text combinations to generate result data. They are useful when a test uses the same limited number of result terms over and over again, perhaps modified by a adjective. Not all tests or results will have Result Sets available.
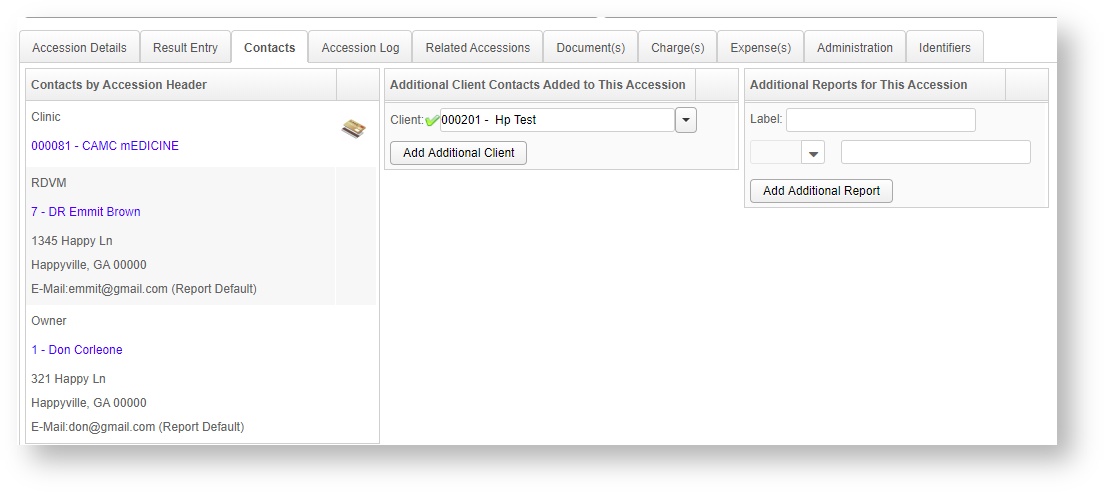
Contacts Tab
This screen is used to send reports to existing contacts on the accession, add additional contacts to the accession, and add email/fax numbers to the accession that are not associated with any client.
Additional Reports can be set for any accessions for cases that are being tracked by another department within your hospital, or state reporting agencies for that test. (E.g. Coggins test results being reported to states that require those results.)
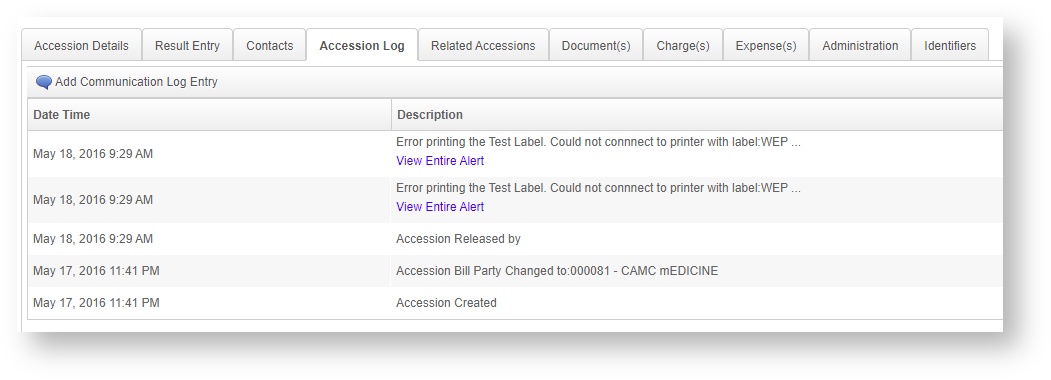
Accession Log Tab
This screen is used to view communication log entries on an accession. Many log entries are automatically added, but entries can be manually entered as well.
Errors will also be reported on this tab, if they are generated while processing the accession.
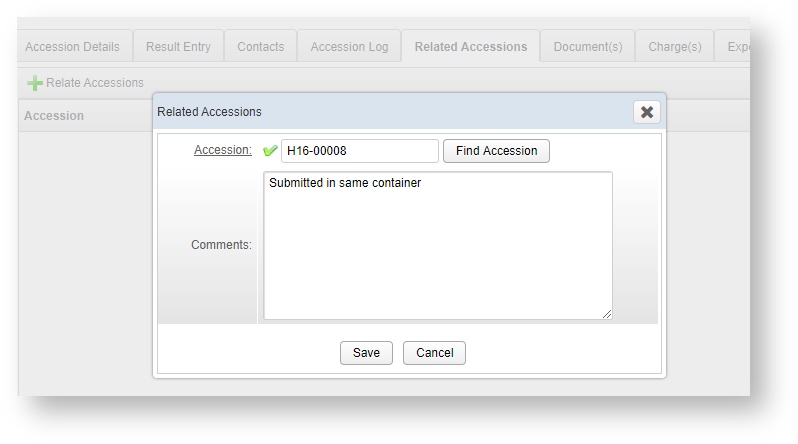
Related Accessions Tab
This screen is used to associate other accessions with the current accession. For example, if an accession is limited in size due to machine processing, the batch of specimens can be split and linked together.
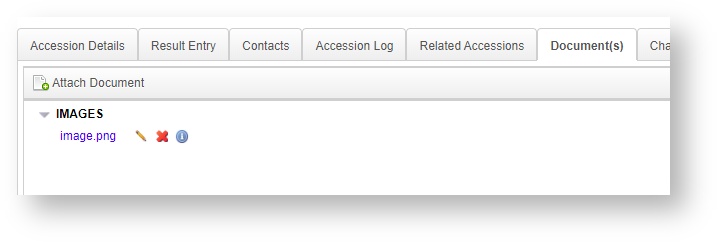
Documents Tab
This screen is used to view and add documents to the accession. Many documents are automatically added to this screen. For instance, if an report is emailed/faxed, it is automatically attached as a document to this screen.
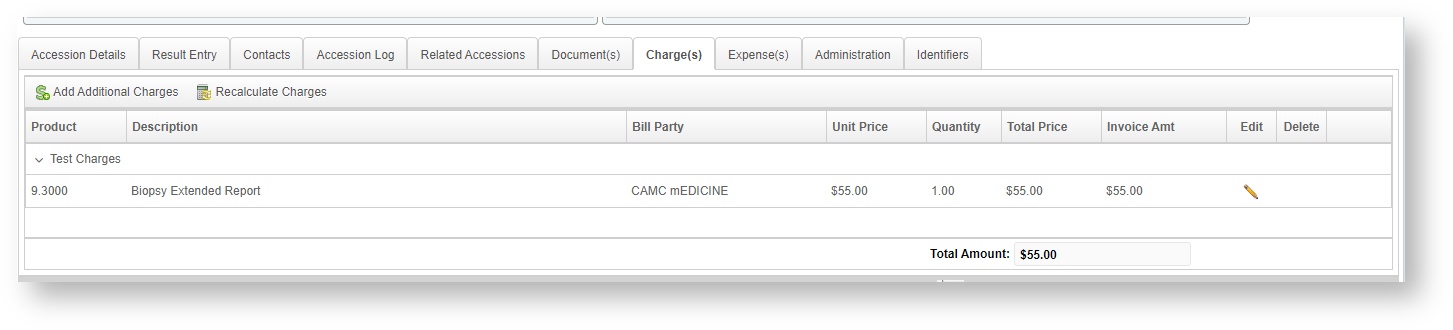
Charges Tab
This screen is used to view, edit, add, and delete charges on the accession. The charges are calculated in real time. (Improvements were made in 2.0 for how charges are calculated for large accessions to improve performance.)
Expenses Tab
This screen details the expenses associated with any items added to the accession. If there are no expenses set-up in association with the tests and charges on a particular accession, no expenses will populate to this screen.
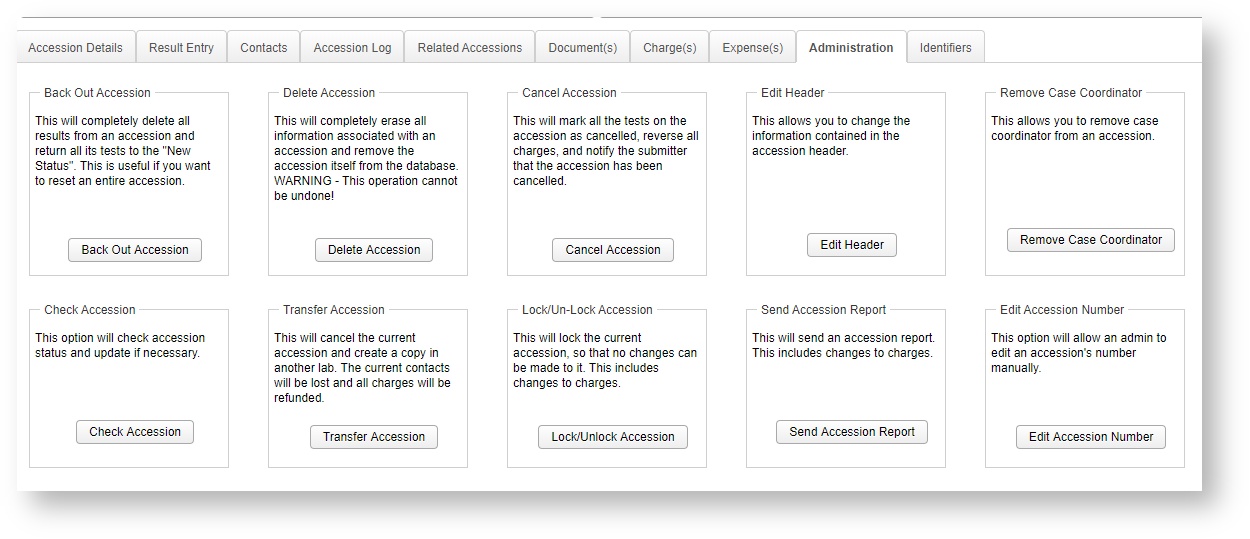
Administration Tab
This screen is used to perform a variety of administrative actions. Access to this tab is restricted by user role.
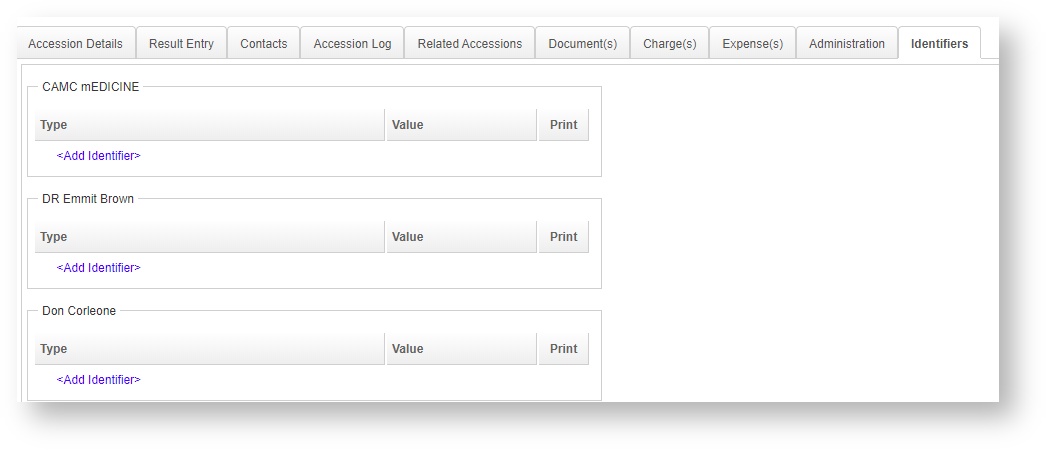
Identifiers Tab
This tab is used to create, edit, and save any identifiers that are associated with a particular client. Use this to add state license or registration numbers or other identifying information where applicable. This information will also be stored as part of their client record for the future.
VetView Wiki Most recent releases of VetView: Version 5.0.4 (Released 3/10/2025) and 4.2.10 Hotfix (2/28/2025)