Labs Worksheet (3.1)
Labs Worksheet (3.1)
The Labs Worksheet screen allows a user performing a batch of accessions to search for their assigned work, create a spreadsheet style form for data entry, and perform the tests and data entry all at once.
In Version 3.1 of VetView, this screen was merged with the List Search screen that was previously only available in Navigation.
We have also added support for specimen entry in a 96 well plate layout.
List Search
At the top of this screen is a section to search for existing Worksheets. Each parameter can be used in conjunction with others, to help you narrow down search results to only those you want to see.
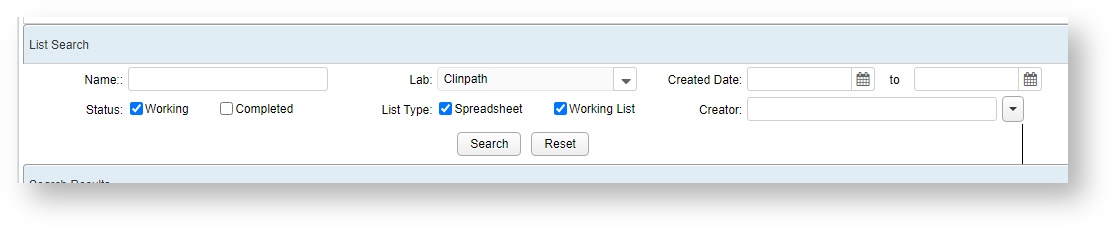
| Field | Description |
|---|---|
| Name | Search for worksheets based on the name. The auto naming convention will usually include the performing workstation, the test, and the date the worksheet was created. |
| Lab | Search for worksheets based on lab, |
| Created Date | Search for worksheets created during a specific date range. |
| Status | Searches for worksheets based on status. A worksheet is in Working status once it is created, until it is manually marked as complete, or all tests are in Finalized status. |
| List Tyle | Searches for worksheets based on the type of list. The type is selected at the point of Worksheet creation depending on the task. Spreadsheets are meant to be done concurrently, such as a large batch PCR test. Working Lists are meant to be done consecutively, such as bacteriology cultures or histology slides. |
| Creator | Searches for worksheets based on the user who created it. This can be useful for finding only your worksheets within a recent date range. |
Search Results
The matching Worksheets will display in the Search Results window below. Click on a Worksheet to load the accessions associated with it in the window to the right.
On this screen, you can also create a new worksheet, open an existing worksheet by searching for it by keyword, mark the worksheet complete, or delete it if no work was performed against it.

| Field | Description |
|---|---|
| Create Worksheet | Starts the Create Worksheet Dialog box. This box has been improved with new features in VetView 3.1 to support the 96 well plate layout feature. |
| Open Worksheet | Opens the selected worksheet. |
| Mark Worksheet Complete | Marks the selected worksheet as Completed. If all accessions in a worksheet are finalized it should auto complete. |
| Delete Worksheet | If a worksheet was created, but never used, it can be deleted. |
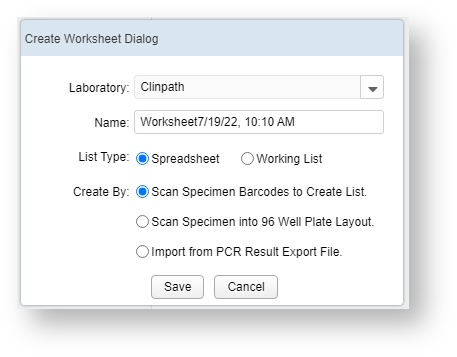
Create Worksheet
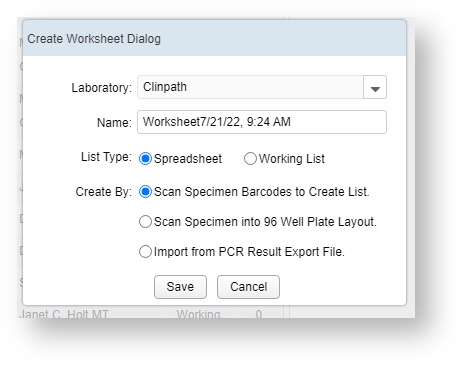
To create a new worksheet from scratch, click on the Create Worksheet button. Enter the lab for the worksheet, and give it a name, then click on the Save button.
Additional dialogue entries will become available: A data entry field to scan the barcode number for the Accession, and a test filter to choose which tests will be performed on these specimens.
Accession Must Be Created
The accession must have already been received and processed to add it to a Worksheet. If a specimen does not have an associated accession, it cannot be added to the worksheet. Contact accession receiving if you get an error about the accession or test not being found.
Spreadsheet
A Spreadsheet list is intended for tests that are performed all at once in a batch. This layout will load all the tests into a single spreadsheet style screen. Alternatively, you can load the tests into a 96 well plate layout for fast specimen scanning using a barcode scanner. This layout also allows you to export the CSV file to a PCR machine, and then import the results back for automatic data entry.
Working List
A Working List style is intended for tests that must be performed consecutively, such as a bacterial culture or histology slide. This layout will load all the lists into screen where they can be opened one at a time and processed at a workstation.
| Field | Description |
|---|---|
| Laboratory | The lab that this worksheet will be linked to. |
| Name | The name of the worksheet. A name will auto generate based on the date and time, to ensure it has a unique name even if nothing else has changed. Worksheets created from the Test Search screen will include the lab workstation instead of the word Worksheet as the default title. |
| List Type | Choice between Spreadsheet and Working List. |
| Create By | Choice between Scan Specimen Barcodes to create a list, Scan Specimens into a 96 Well Plate Layout, or Import from PCR Result Export File (if the accessions and specimens were entered on a third party machine.) |
| Save | Creates the work list and loads the appropriate screen based on the selections. |
| Cancel | Discards the selections and returns to the Worksheet Search screen. |
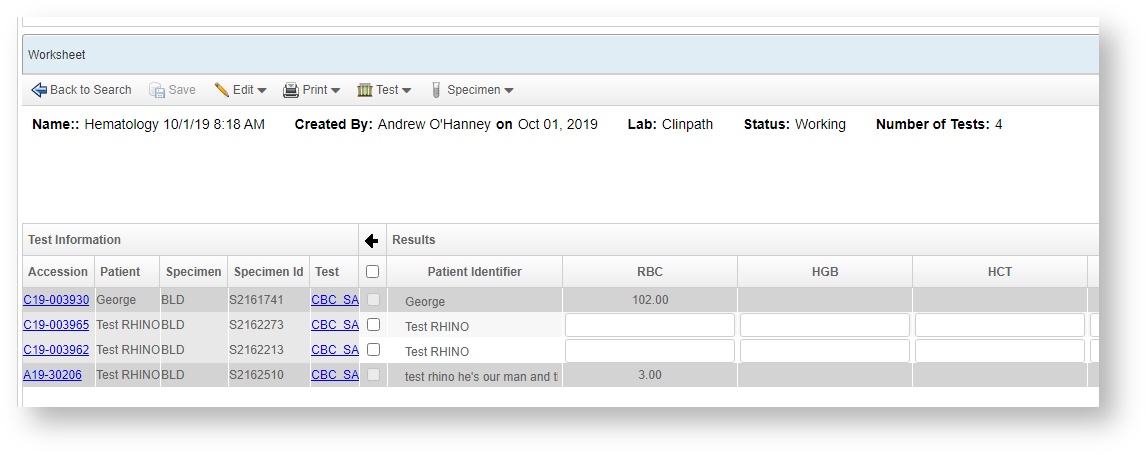
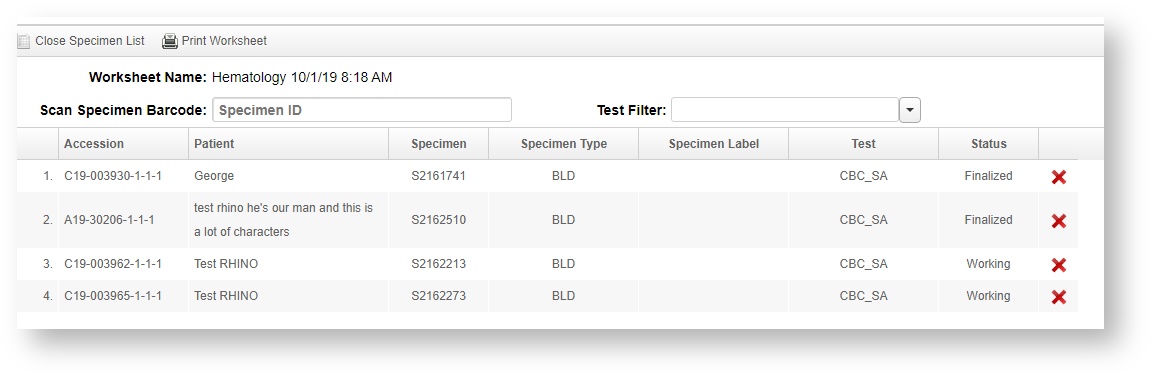
Test Information - Spreadsheet Layout
Once a worksheet has been created or opened, the tests will display in this section. There are two halves to the Test Information list: The left hand columns can be hidden but cannot be edited, as they contain the accession information. The right hand columns cannot be hidden but can be edited, so long as the tests are not in a finalized status.
Back to Search
This will return you to the Worksheet Search screen. It should remember your previous search parameters.
Save button
Applies any results and status changes in the tests to the accessions. If all accessions become finalized, the Worksheet should auto update to Completed status.
Edit Menu
In VetView 3.1 many of the menu options have been placed under the Edit Menu to keep the toolbar from becoming too cluttered.
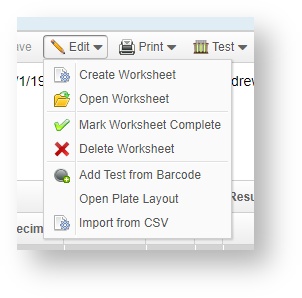
Create Worksheet
To create a new blank worksheet on this screen, click the Create Worksheet option. The new Create Worksheet dialog box will open.
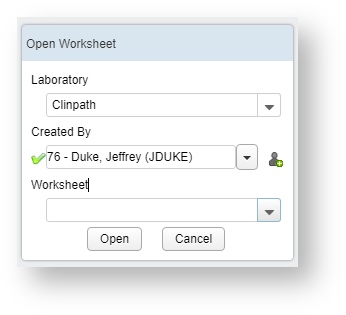
Open Worksheet
To open a different existing worksheet, click on this button. A mini search window for worksheets will open.
Mark Worksheet Complete
This option will change the status of the worksheet from Working to Complete. If all accessions on a worksheet are in Finalized status, it will also mark as complete, but you can use this option if certain accessions are in a different status and the worksheet may not be marked complete automatically as a result.
Delete Worksheet
If a worksheet was created in error, this will delete the worksheet. Since an Accession and a Test can be associated with multiple worksheets, you can safely delete a worksheet without impacting the linked accessions.
Add Test From Barcode - Specimen List
To add one or more new tests from a barcode, click on Add Test from Barcode. This will open the new Specimen List Screen.
Ensure your cursor is in the Specimen ID box, and start scanning. VetView will automatically find the associated test and accession, and add it to the list.
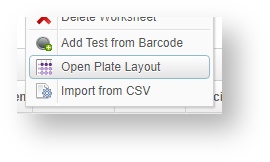
Open Plate Layout
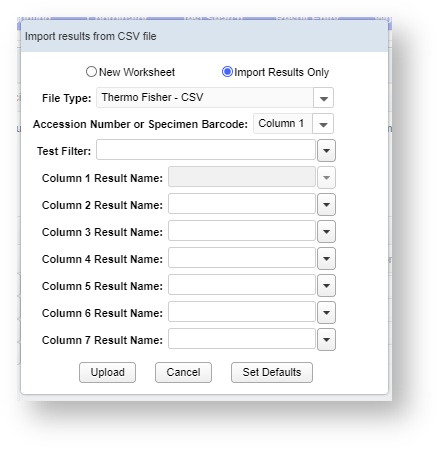
Import from CSV
This option, available in VetView 1.7.10 and 2.0.5, allows you to import the results from an external machine that does not have an electronic interface that can speak to the API but can only release results onto a USB drive. You will need to select the correct test, manually match the columns on the CSV to the output columns on the test, and then Upload. You can choose to create a new worksheet, or imported the results to an already opened worksheet. All results imported in this manner must already have an accession associated with them, or else the import process will fail.
This process only works with a limited number of external testing devices that do not have the ability to interface with the VetView API. Please contact Jeff Duke for any questions about this import process.
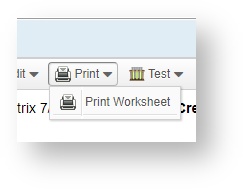
Print Menu
This button opens up a PDF version of the worksheet to allow you to print and then process the list on paper or cross check it against the samples in a machine that is not near your computer.
If there are any custom Local Reports, they can appear in this menu as well.

Test Menu
This menu contains the options to change the status of the tests on the Worksheet.
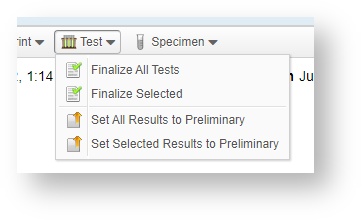
Finalize All Tests
The Finalize button has options to finalize all the tests in the worksheet. If this also sets all tests on each Accession to Finalized, depending on the test settings, this should automatically Finalize the accessions and mark the Worksheet complete.
Finalize Selected
This sets the selected tests to finalize. Use this option if some tests will need to be cancelled or run a second time.
Set All Results to Preliminary
The Preliminary button has options to set all results to preliminary. This option does not set Accessions to Finalized status.
Set Selected Results to Preliminary
This option will set certain results to preliminary, and leave the others in Working status. Use this option if certain tests need to be verified or need additional review.
Specimen Menu
This menu allows you to change the location of all specimens, or only certain specimens, if your lab utilizes Specimen Tracking.
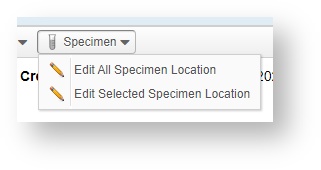
Select the option and then choose the new Specimen Location from the menu. Then click on Save to apply the changes.
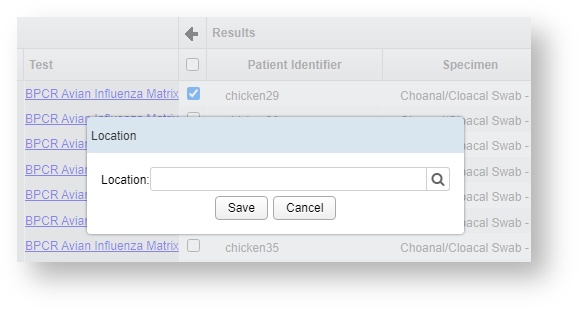
Plate Layout
For spreadsheets intended to be used with a batch PCR machine, VetView 3.1 and later supports a 96 well plate layout.
Click on the Open Plate Layout button to change to this view.
The spreadsheet view will transform into a plate layout, with columns 1-12 and rows A-H labeled on the screen.
Click on a cell to scan a specimen barcode, or to set it as a positive or negative control.
For more information, please see: How To Create a Batch Worksheet for a 96 Well PCR Test (3.1)
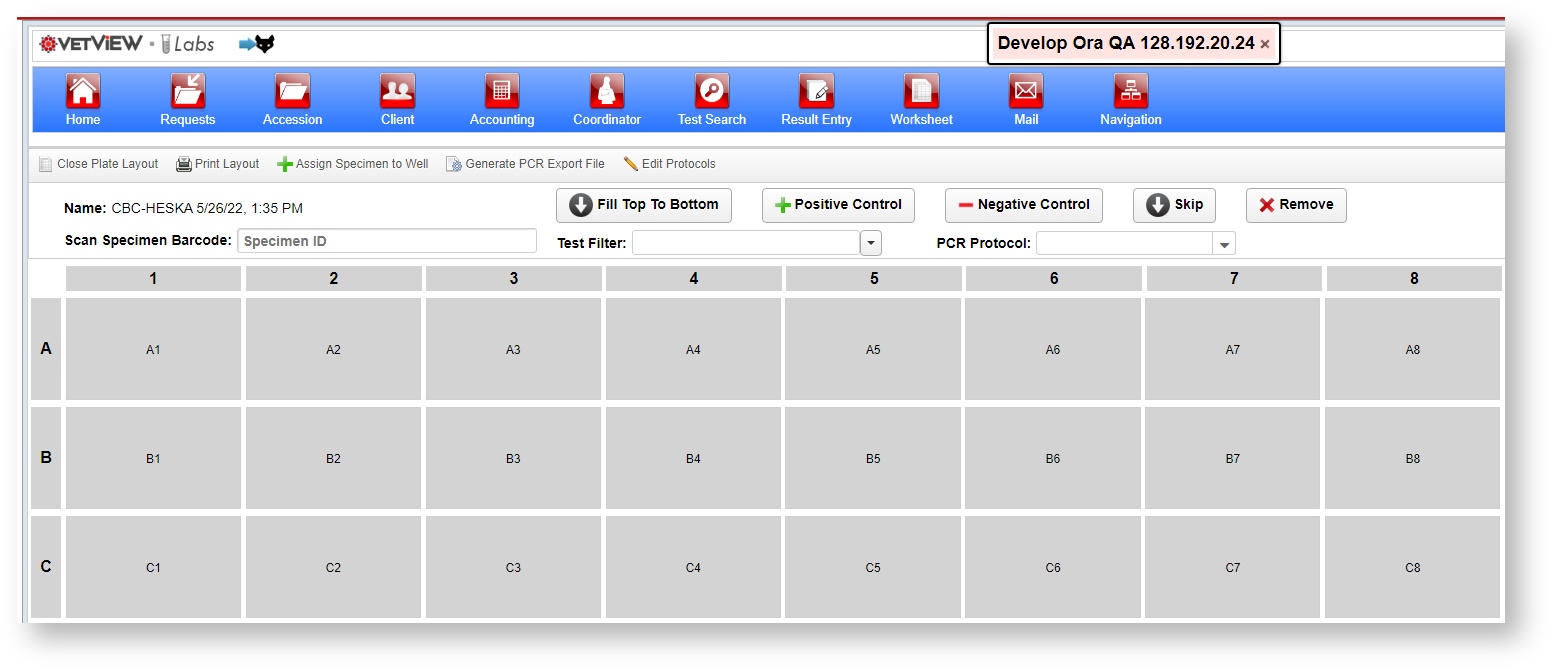
| Field | Description |
|---|---|
| Close Plate Layout | Returns you to the Spreadsheet layout for this worksheet. No changes are lost. |
| Print Layout | Prints the Plate Layout into a unique grid report that is identical to the view on the screen. |
| Assign Specimen to Well | Display a list of all the specimens currently associated with the Worksheet that have not yet been assigned to a well, and double click them to enter into the current cell. If you are not using a barcode scanner, this may be the fastest method for data entry. |
| Generate PCR Export File | Once all the data has been entered, click this button to create a Comma Separate Value file that can be read by QuantStudio 5 (Thermo Fisher) or by 7500 Fast machines. You will also need to select the test protocol from the list. |
| Edit Protocols | Create or modify PCR protocols. You will need to work with the test manufacturer to set the Test Name, Description, Control Name, Control Task Types, Target Gene(s), and dye colors. |
| Scan Specimen Barcode | Enter the Specimen ID by scanning the barcode or manually entering the ID. Upon clicking enter, the specimen, test, and accession will automatically be linked with the cell, and the cursor will move to the next cell in the row or column as appropriate. |
| Fill Top to Bottom | Indicates that the spreadsheet is currently filling rows at the top of the column, then moving down to the next row. If you click this button, it will change to Fill Left to Right and instead change cell to cell across the row before moving to the next row. |
| Positive Control | Sets this cell as a positive control. Set this according to your lab's protocols. For example, one common method is to set the bottom right cells (H10, H11, and H12) as the positive controls. |
| Negative Control | Sets this cell as a negative control. Set this according to your lab's protocols. For example, one common method is to set the upper left cells (A1, A2, A3) as the negative controls. |
| Skip | Leaves this cell in the array blank. Use this if the specimen is not acceptable or the plate array does not use this cell. |
| Remove | Clears the contents of the selected cell. Removes the specimen, test, and accession link, and resets the cell to a blank state. |
| Test Filter | If multiple tests will be run in a single batch, this option will limit the visible cells to only those which will have that test run against them. |
| PCR Protocol: | Select from the list of protocols created under the Edit Protocols button. |
VetView Wiki Most recent releases of VetView: Version 4.1.3 Hotfix (Released 2/16/2024)